
What is Node Sequence
Dehancer Pro is a full-featured plugin which in some cases may be used as a single and complete tool for grading.
As far as new features are constantly appearing, our plugin often allows to eliminate redundant effect nodes and make basic processing within the single Dehancer node.
While using additional nodes, we recommend placing them in a specific order.
This helps avoiding unnecessary or improper color transformations and achieving maximum image quality as well as maintaining a flexible and versatile pipeline.
Basic rules
Dehancer OFX plugin node should always be placed at the end of the processing chain.
Last but no least — it’s better to start grading with Dehancer configuration.
Then other additional color correction nodes (White Balance, Color Wheels, Curves etc) and local masks could be added. And they should be located before Dehancer node.
Thus node sequence is built from tail to head, Dehancer node is added to the end, then other nodes are placed at the beginning, before Dehancer.
Occasionally some specific nodes not related to color correction may be located after Dehancer (for example, Sharpen filters, etc).
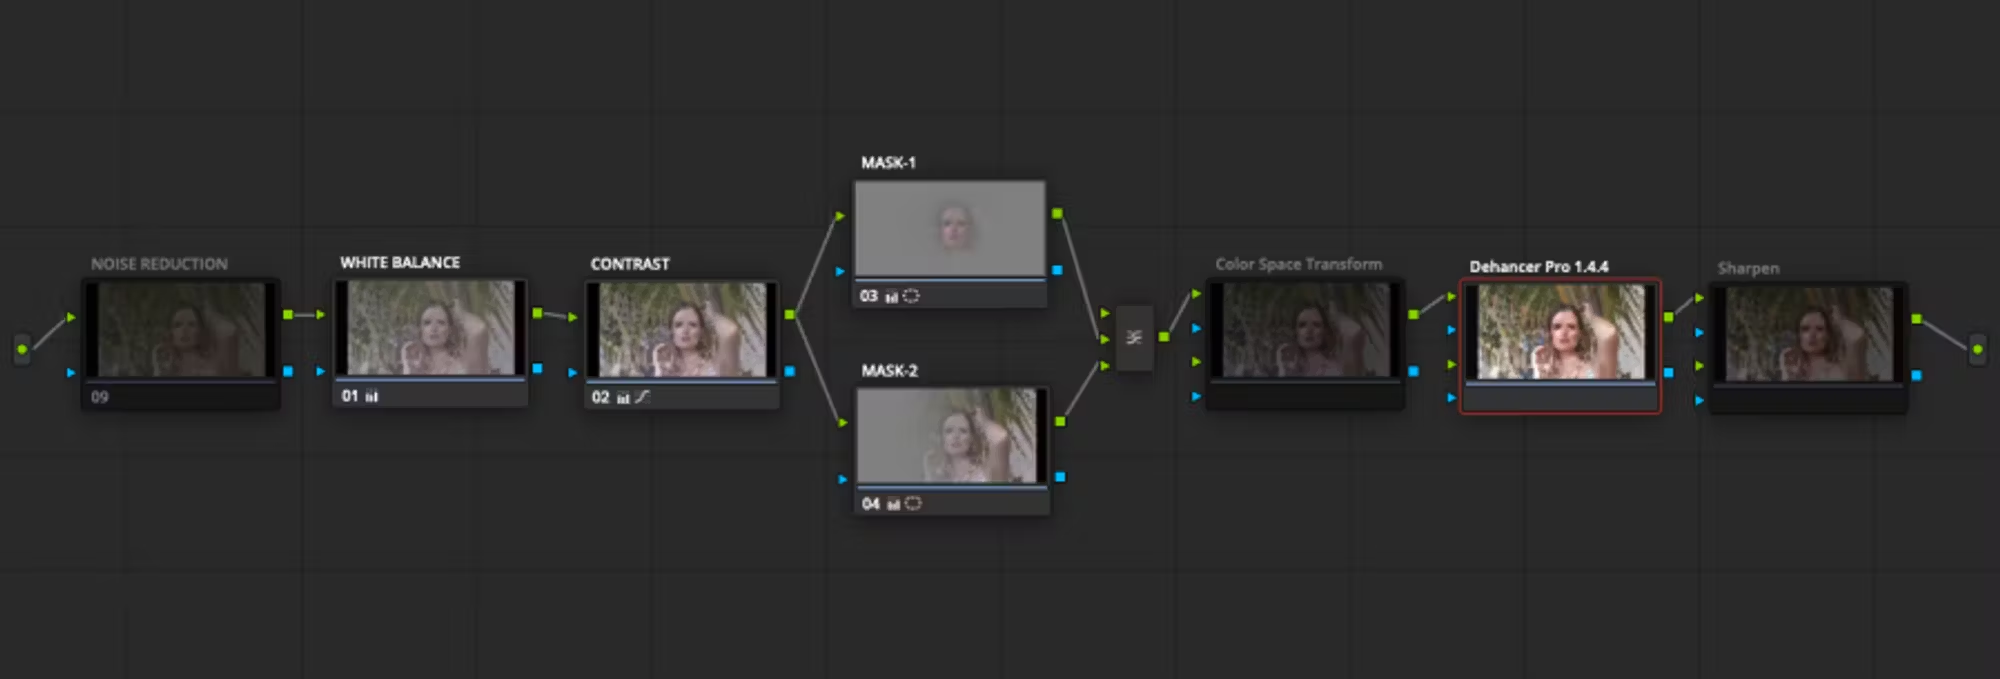
Node sequence
Additional nodes also should be properly placed. We recommend this layout:
(Noise Reduction) → White Balance → Contrast → Masks → (Color Space Transform) → Dehancer OFX → (Sharpen)
1. (Noise Reduction)
Noise reduction (if needed) is typically the first node. Although this is not always the absolutely best solution in terms of image quality, but practically it is the most convenient one.
2. White Balance
If there is white balance correction needed, it should be done at the very beginning, because it is the first and the primary image correction.
Hence WB node should be applied to the ‘untouched’ footage, if possible, to the source RAW file, using Camera Raw white balance settings.
Since white balance setup is essential for color separation quality, therefore all subsequent tools (e.g., Qualifier) depend on it.
3. Сontrast
The second processing stage is Contrast setup along with all corrections related to exposure, brightness and contrast of the entire image. These could be Color Wheels, Curves, Shadows/Highlights, etc.
4. Masks
After the entire image is basically corrected, some local adjustment usually follows. A serial or parallel node is acceptable.
If both color and contrast require treatment, contrast should be corrected first, because color perception strictly depends on luminance.
5. Color Space Transform
If Color Space Transform (CST) or LUT node is used for clip interpretation (instead of Input camera profiles in Dehancer) — these nodes should be located before the plugin, so it gets the corrected input.
6. Dehancer OFX
This is the main ‘look’ node where grading begins with Dehancer settings.
Dehancer research is generally based upon analogue processes. Therefore all tools inside the plugin are grouped and ordered to mimic the film photography pipeline. After conditions are specified, then film is selected, processing and printing follows.
7. Sharpen
Final touch-up effects and corrections (e.g., sharpening) may be used after Dehancer node, considering, however, that it could change the appearance of some Dehancer effects like grain, halation, etc.
Above-mentioned node sequence is recommended for both video and static image (photo) processing.
How to use separate Bloom, Halation and Grain plugins in node sequence
If you are using Dehancer Grain, Dehancer Bloom and Dehancer Halation separate plugins, we recommend that you adhere to the following node structures for their correct operation:
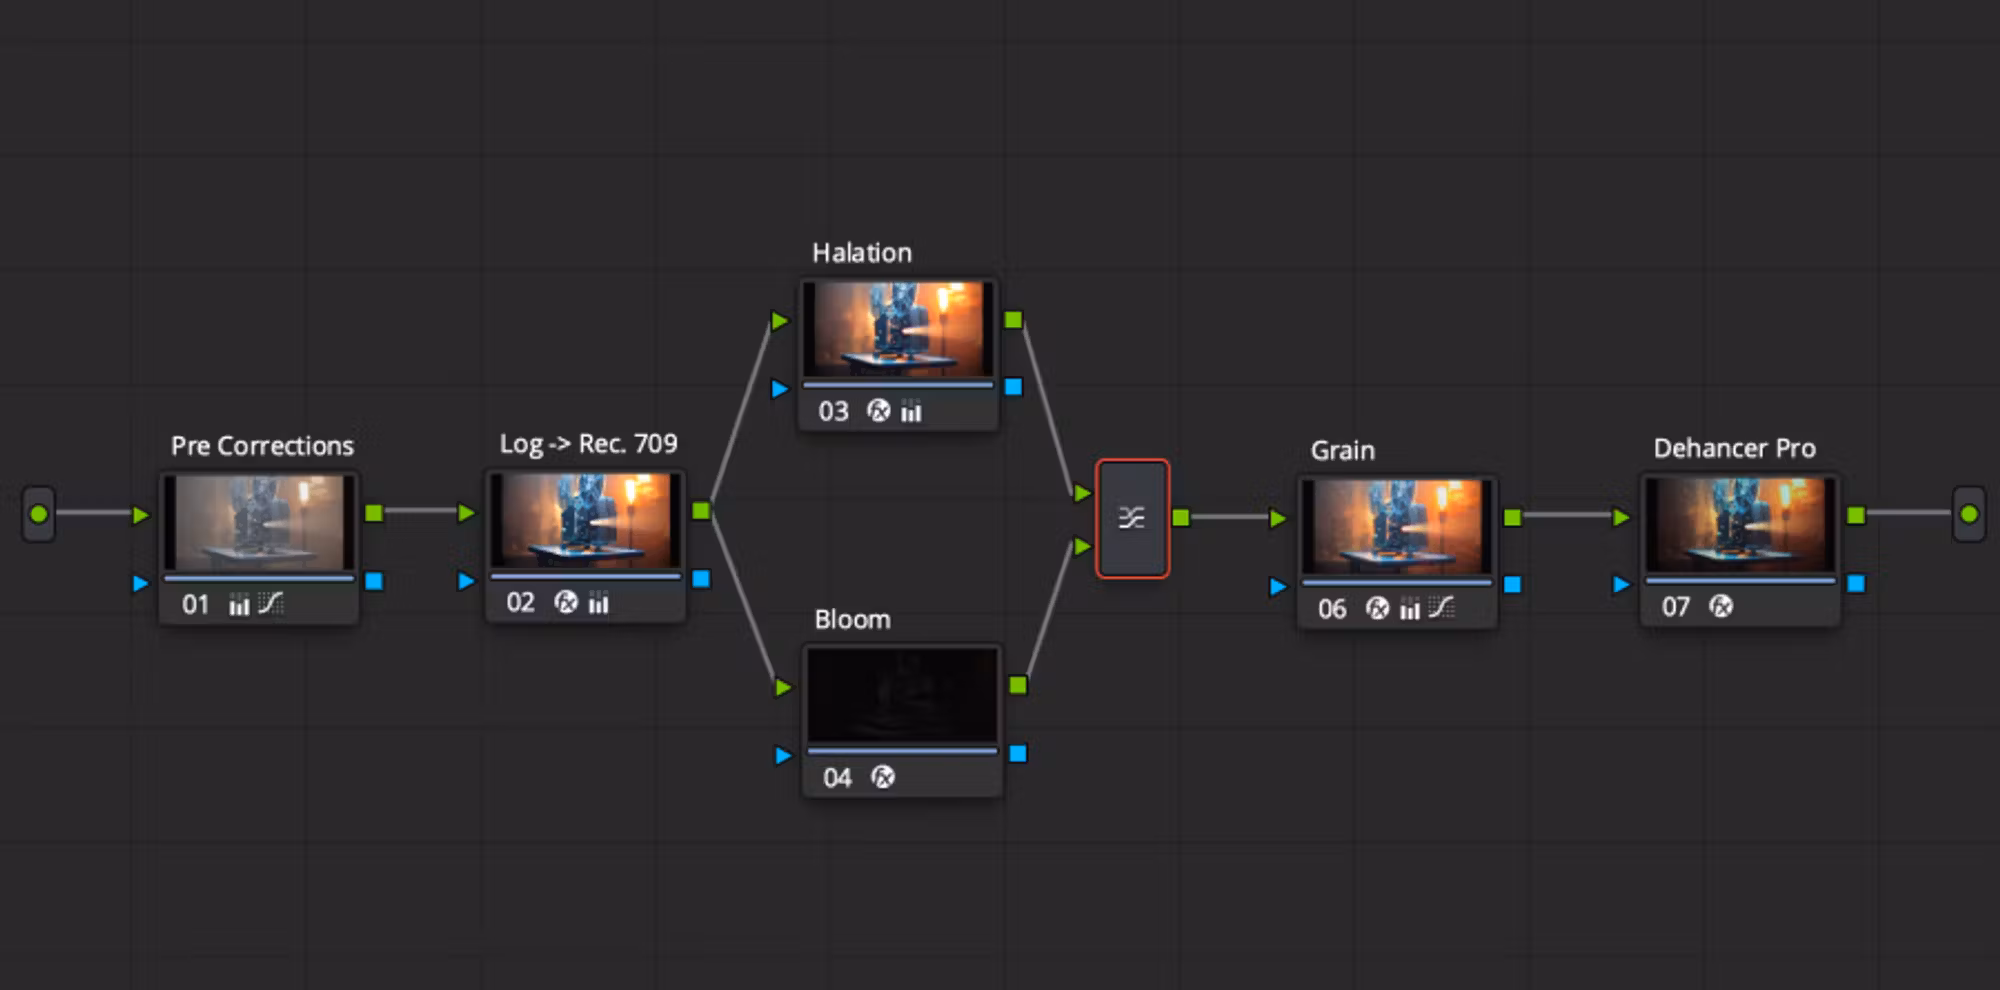
This node structure is recommended for timelines in DaVinci YRGB Color Space. For ACES pipeline there must be two Color Space Transform nodes set before and after the described sequence to allow Dehancer plugins to work in the Rec.709 space.
If Dehancer Pro is used as the last node, then Rec. 709 must be selected in the Input parameter group. The Grain, Bloom and Halation tools in this node must be disabled.
Log -> Rec. 709 interpretation must happen in a separate node before the Dehancer Bloom and Dehancer halation. You can use a Dehancer Pro plugin with all tools disabled except Input, Color Space Transform, vendor LUT and other methods for interpreting the source material.
Dehancer Bloom and Halation nodes are placed in parallel. Composite mode for Layer Mixer – Add:
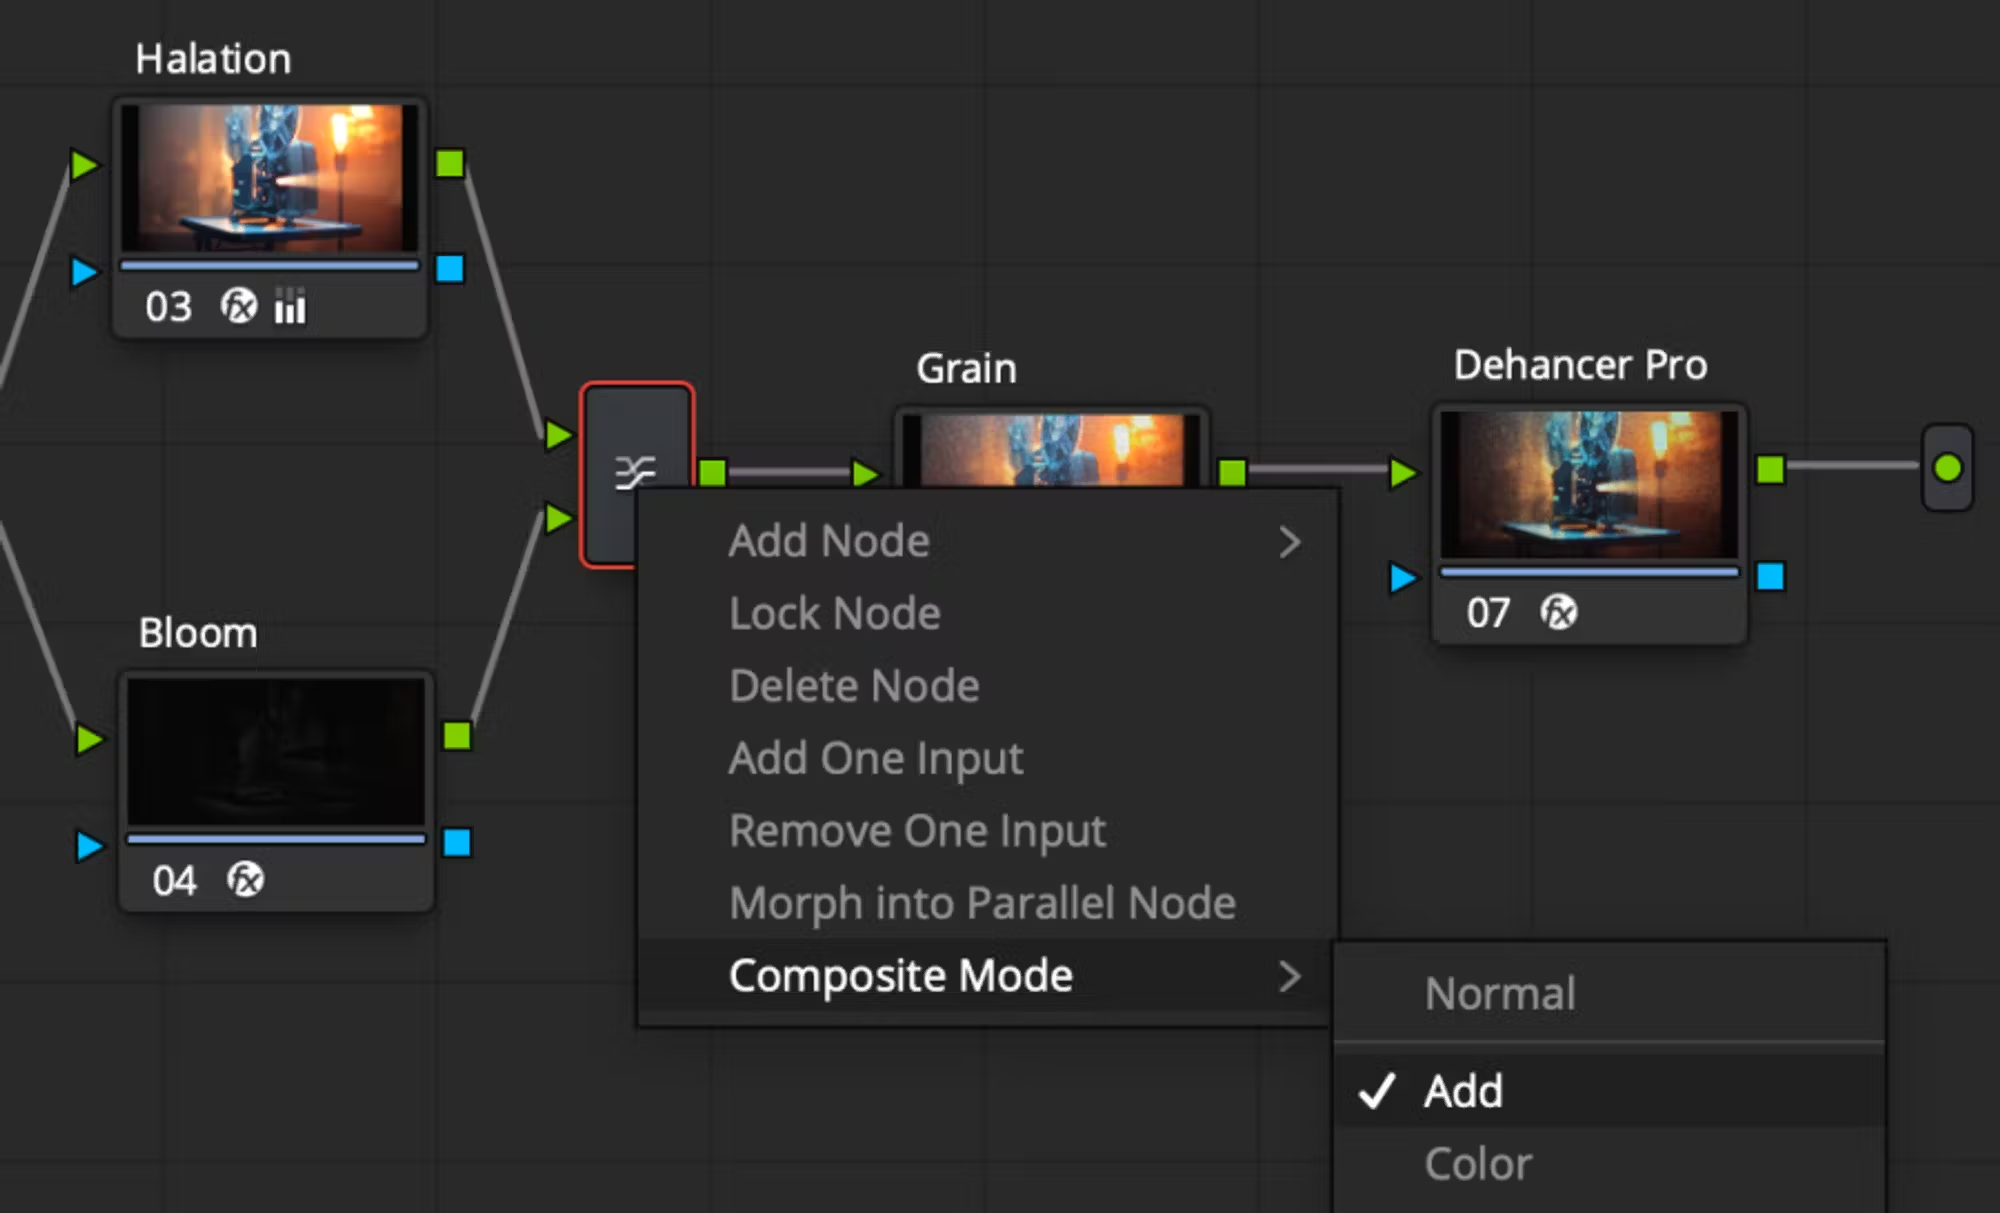
In the Dehancer Bloom node, check the Mask Mode checkbox:
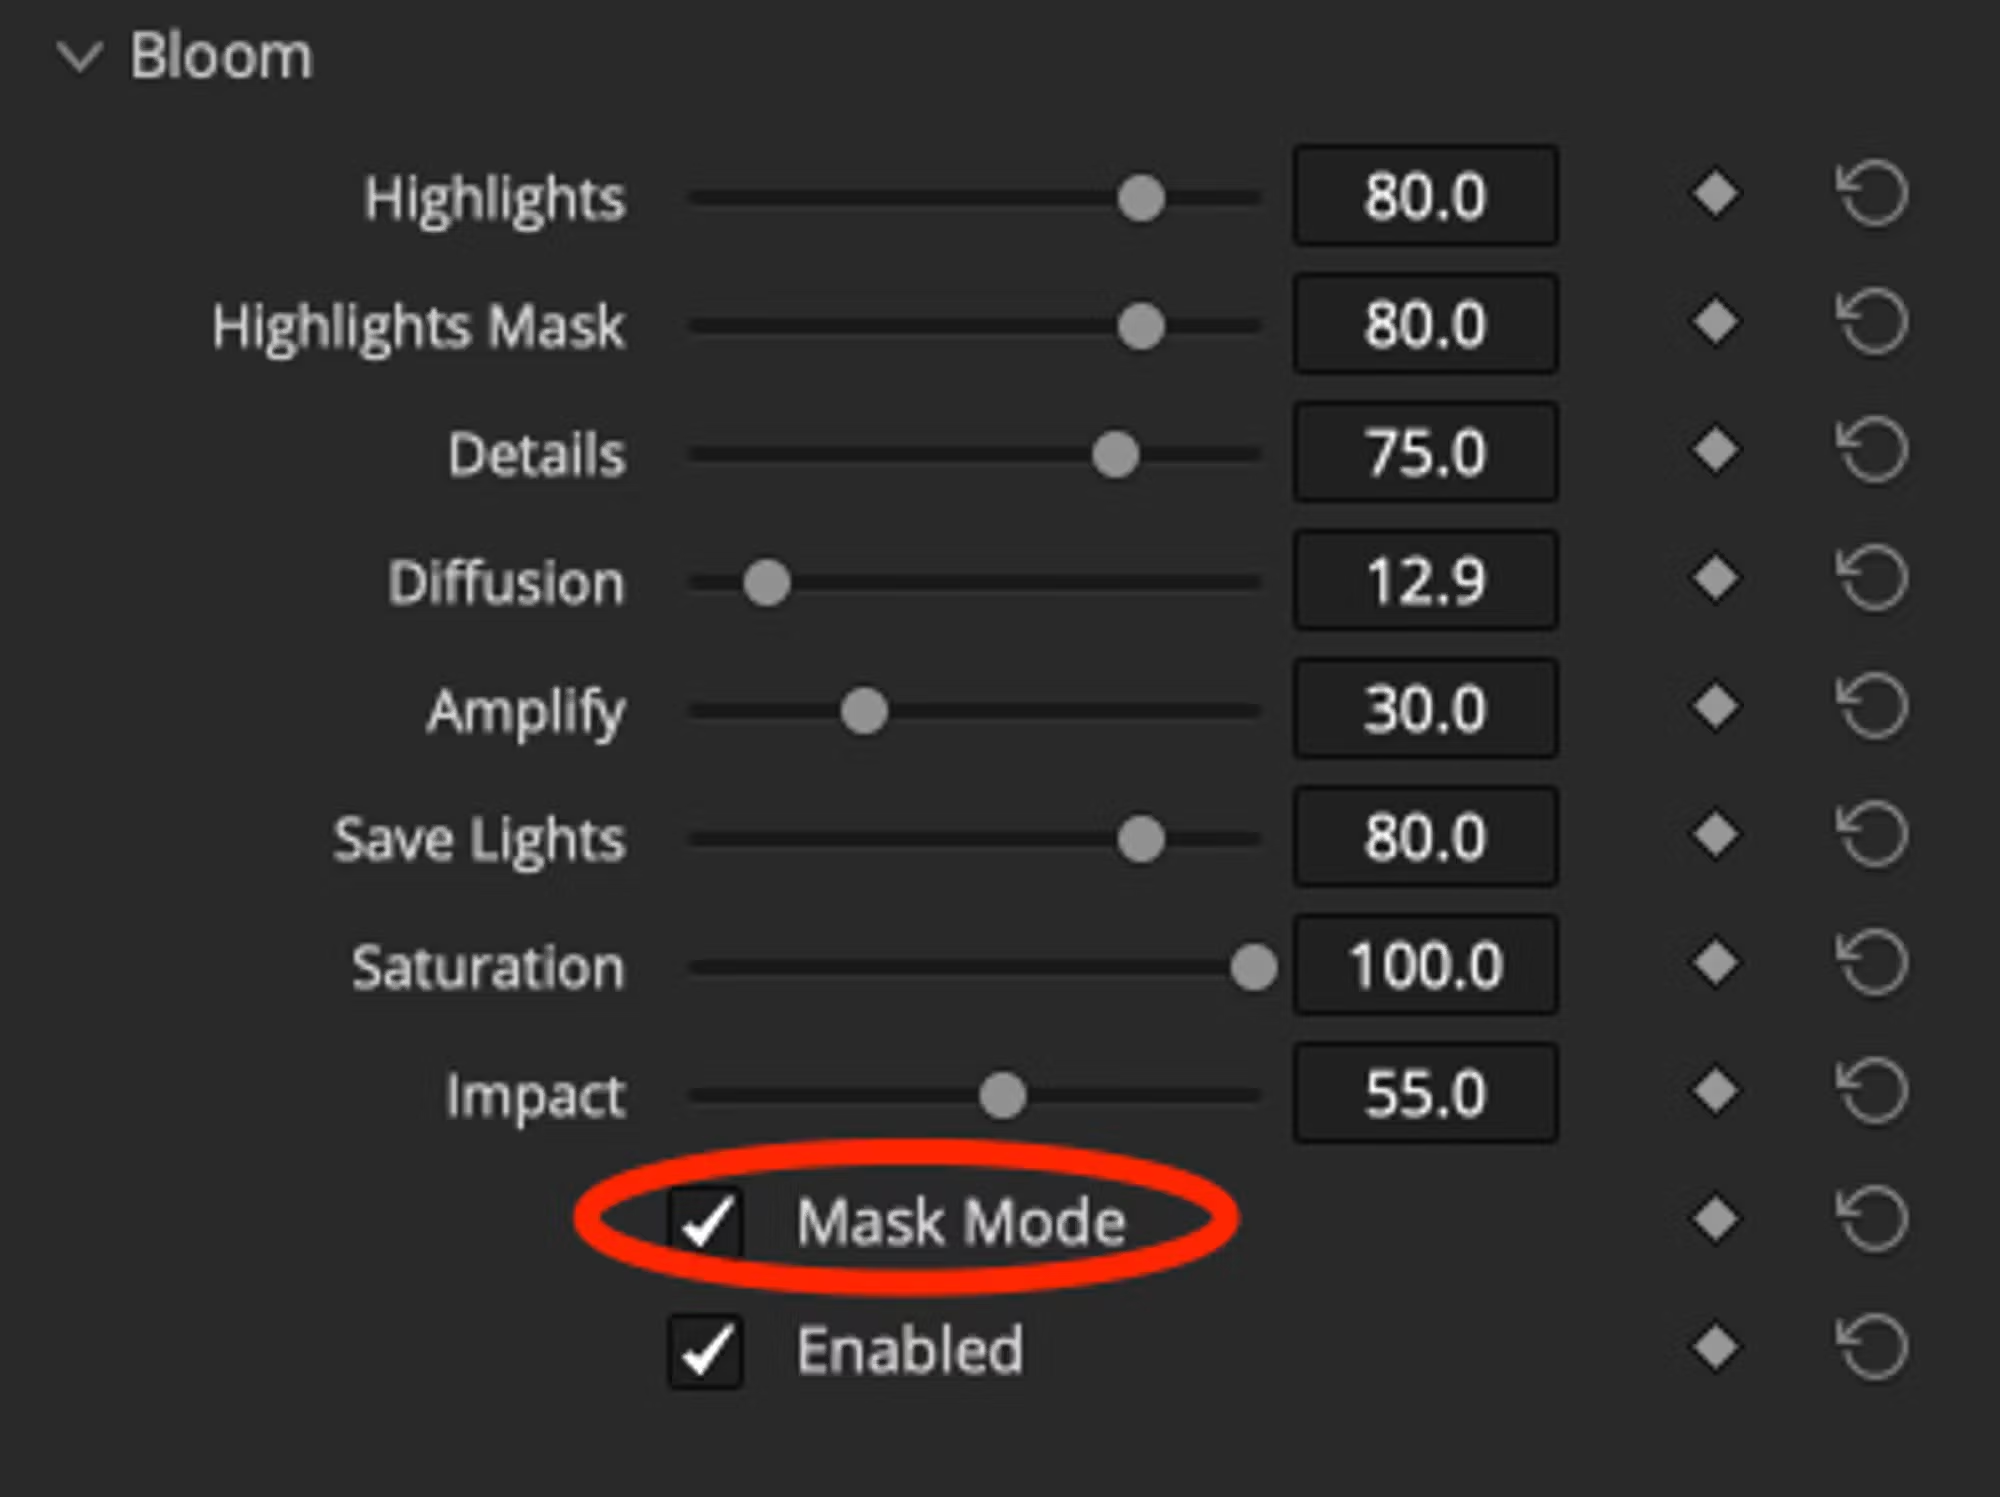
In order to view Dehancer Bloom in Mask mode, disable the Halation node ( CMD+D hotkey)
For correct operation of Halation plugin, the project setting much be set as follows:
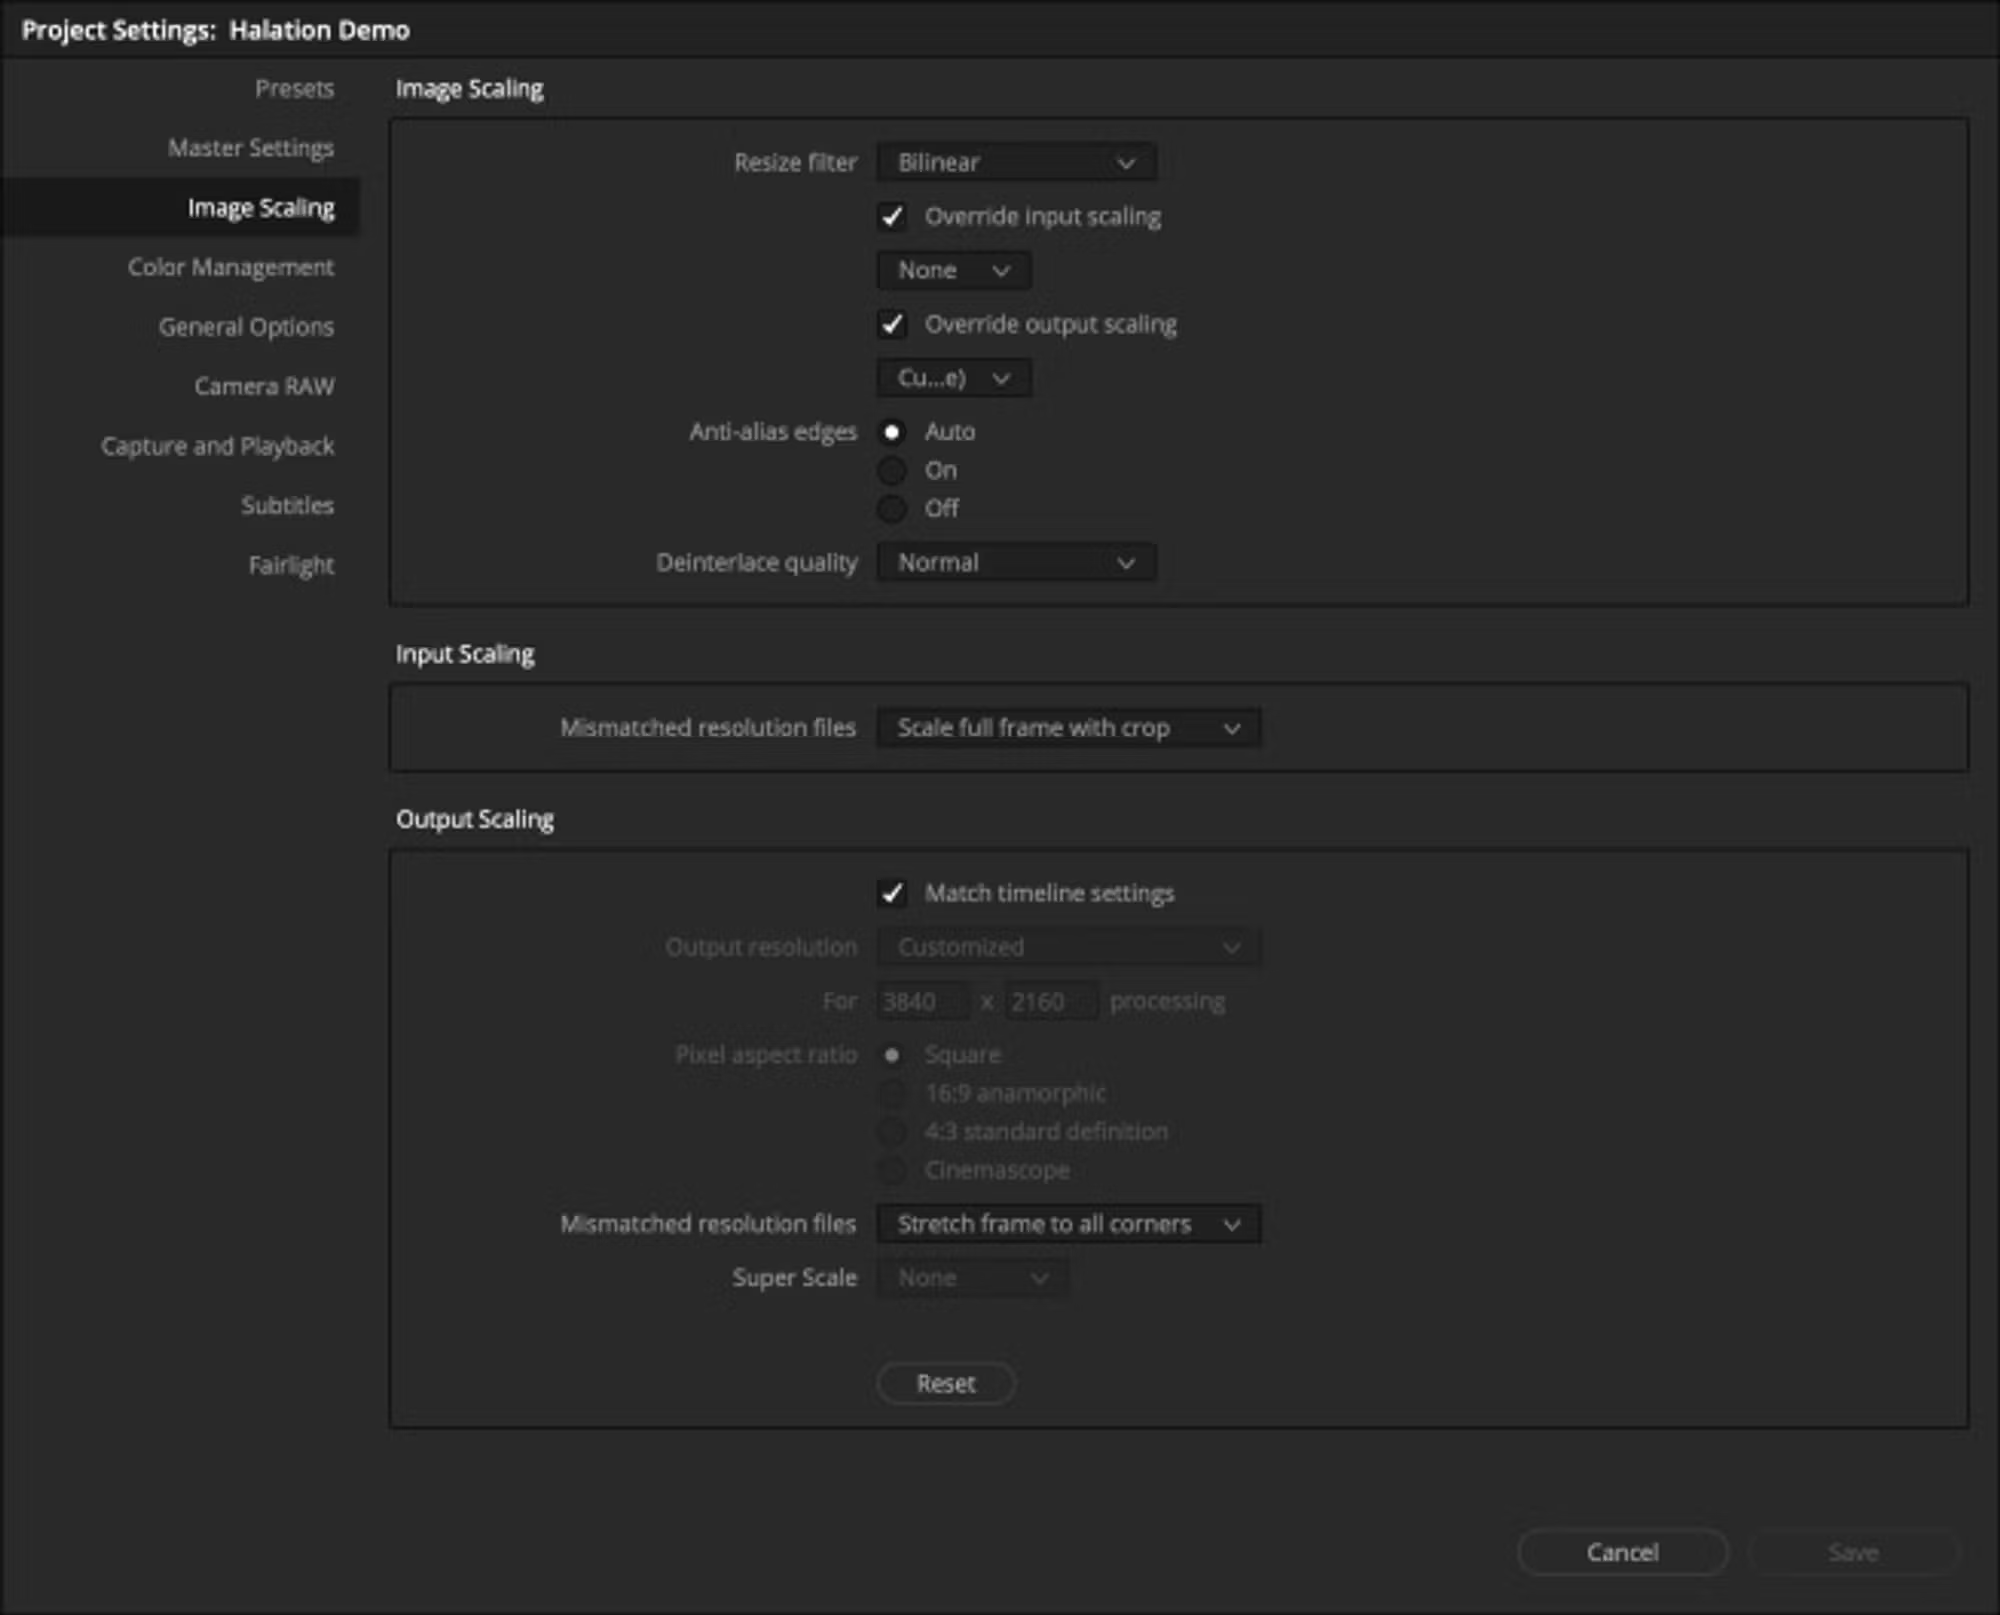
Particularly note the Resize filter set to Bilinear.