
- fdsajkfdsafsadfs
fdasfhdsjkfhsadk
fhdajkfhdsakfdsh
- fhsajfhdsafkjdhsfjd
jhhhkjafjsdkahfdskjhakdgdsgfg
авыфавыфаывфавф
hfkjdshfjhdskfhdak
jkfdshfjdshafkjdshakfjsdhka
fdsafdafd
jwkfwjklfjwlfjew
etc.
Dehancer OFX Plugin
Dehancer Final Cut Pro Plugin
Adobe Ae/Pr Plugin
Dehancer Affinity Photo Plugin
Dehancer Photoshop Plugin
Dehancer Capture One Plugin
Dehancer Lightroom Classic Plugin
Uninstall guide
Downloading and installing the plugin / Windows
- Make sure that your computer meets the system requirements for the plugin to work correctly.
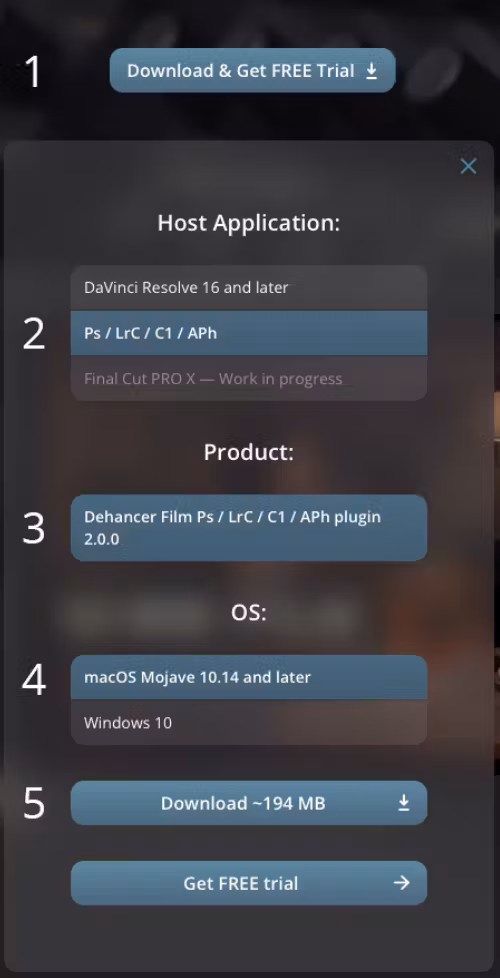
- Press the button Download and Get FREE Trial.
- Select DaVinci Resolve as the Host Application.
- Select Windows 10 as your Operating System.
- Select the desired Dehancer plugin.
- Hit Download button. Your download will start automatically.
- Make sure that DaVinci is not running. Please, keep DaVinci closed until installation is complete.
- Run the installation file and follow the installation steps.
- Normally, older plugin versions will be removed during the installation procedure automatically. If the update does not technically allow to maintain settings compatibility, new version will be installed as a separate, independent plugin.
- Restart DaVinci Resolve.
- Go to DaVinci Preferences / System / Memory and GPU and make sure the compatible GPU is selected.
Downloading and installing the plugin / MacOS
💡 Attention!
If Dehancer doesn’t appear in the plugin Library or fails to load:
- Go to DaVinci Preferences → System → Video Plugins
- Re-enable the checkbox of Dehancer plugin(s)
- Restart DaVinci.
2.1. Press the button Download and Get FREE Trial.
2.2. Select DaVinci Resolve as the Host Application.
2.3. Select macOS as your Operating System.
2.4. Select the desired Dehancer plugin.
2.5. Hit Download button. Your download will start automatically.
- Unzip the downloaded zip file, if your system didn’t do it automatically.
- Make sure that DaVinci is not running. Please, keep DaVinci closed until installation is complete.
- Run the installation file and follow the installation steps.
- Normally, older plugin versions will be removed during the installation procedure automatically. If the update does not technically allow to maintain settings compatibility, new version will be installed as a separate, independent plugin.
- Restart DaVinci Resolve.
- Go to DaVinci Preferences / System / Memory and GPU and make sure the Metal option is available and switched on.
Downloading and installing the plugin / Linux
- Make sure that your computer meets the system requirements for the plugin to work correctly.
- Download the latest version of the plugin from 2.1. Press the button Download and Get FREE Trial. 2.2. Select DaVinci Resolve as the Host Application. 2.3. Select Linux as your Operating System. 2.4. Select the desired Dehancer plugin. 2.5. Hit Download button. Your download will start automatically.
- Unzip the downloaded zip file, if your system didn’t do it automatically.
- Make sure that DaVinci is not running. Please, keep DaVinci closed until installation is complete.
- Run the installation file and follow the installation steps.
- Normally, older plugin versions will be removed during the installation procedure automatically. If the update does not technically allow to maintain settings compatibility, new version will be installed as a separate, independent plugin.
- Restart DaVinci Resolve.
- Go to DaVinci Preferences / System / Memory and GPU and make sure the compatible GPU is selected.
Adding Dehancer to the Project
Before you start, you need to add Dehancer to the project. After that you will be able to perform the remaining steps of installation, downloading profiles and License Activation.
- Select any clip on the timeline
- Open the Color tab, go to the Library panel and find ‘Dehancer’ at the bottom of the Film Emulation plugin section.
- Simply drag ‘Dehancer’ to your clip as a separate node.
💡 DaVinci Resolve allows to use Dehancer plugin in different workflows and color pipelines, please refer to the Dehancer OFX Plugin Quick Guide for more information.
Downloading Film and Camera Profiles
Before using Dehancer you have to download film and camera profiles.
- Navigate to the bottom of the plugin settings and find the Check Profiles button. This allows you to download or update the profiles at any time.

kjfsdalfjfdsaljfds jfdljfdks af adsjf sladfdasfdakjf dsjf dajflaj fdsa fdsj dj flasj fl dsjflsda kjfsdalfjfdsaljfds jfdljfdks af adsjf sladfdasfdakjf dsjf dajflaj fdsa fdsj dj flasj fl dsjflsda kjfsdalfjfdsaljfds jfdljfdks af adsjf sladfdasfdakjf dsjf dajflaj fdsa fdsj dj flasj fl dsjflsda
- The Dehancer Profiles widget will open and the Film and Camera profiles will be downloaded and installed automatically.

- Once the profiles download/update is complete, close the widget with the OK button.
Now Dehancer is ready to use.
Downloading and installing the plugin
- Make sure that your computer meets the system requirements for the plugin to work correctly.
- Download the latest version of the plugin from
- 2.1. Press the button Download and Get FREE Trial.
- 2.2. Select Final Cut Pro as the Host Application.
- 2.3. Select your desired Dehancer plugin.
- 2.4. Hit Download button. Your download will start automatically.
- Unzip the downloaded zip file, if your system didn’t do it automatically.
- Run the installation file and follow the installation steps.
Adding Dehancer to the Project
- After Dehancer installation, restart Final Cut Pro if it was already running.
- Open a Project or Event.
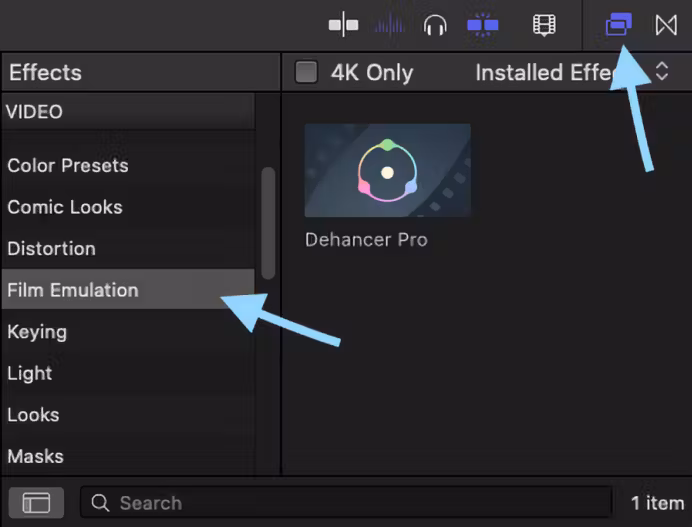
- Click the Effects icon in the top-right corner of the timeline (or press Cmd–5).
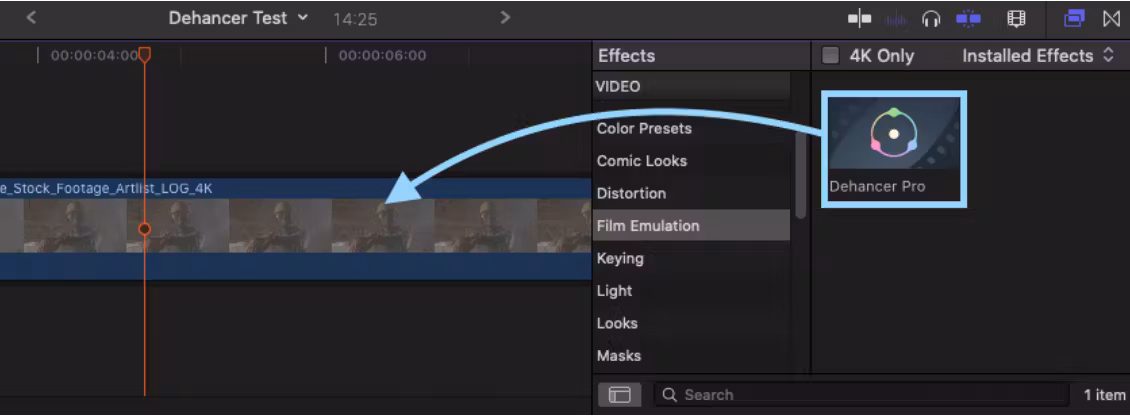
- In the Effects tab, open the ‘Film emulation’ group and find Dehancer Pro or Dehancer Lite.
- Select a clip on the timeline, then drag and drop Dehancer to the clip. Also, you can double-click the effect to apply it to the selected clip.
Tip: In the same way, Dehancer can be applied not only to the individual clips, but also to the Adjustment Layers, thus allowing to grade the entire timeline with a single Dehancer instance. To add Adjustment Layer functionality to FCP, you have to create a blank Motion Template using Apple Motion or download one of the free Adjustment Layer templates available online.
Downloading Film and Camera Profiles
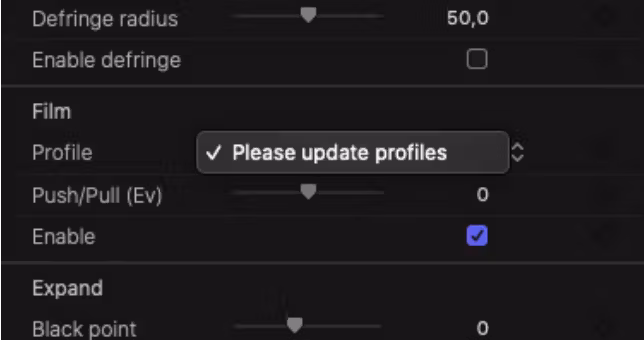
Before using Dehancer you have to download film and camera profiles.
- If the profiles have not yet been downloaded, you will be prompted by the message ‘Please update profiles’ when trying to select a profile:
- Navigate to the bottom of Dehancer plugin settings, find the Options section and click the Check profiles button.
- The Dehancer Profiles widget will open and the profiles will be downloaded and installed automatically.
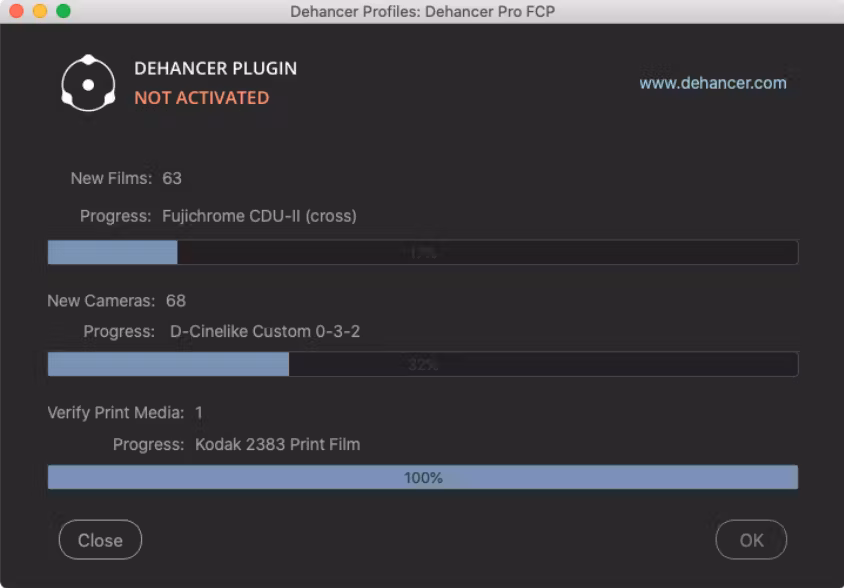
- Once the profiles update is complete, close the widget. Now Dehancer is ready to use
Downloading and installing the plugin / Windows
- Make sure that your computer meets the system requirements for the plugin to work correctly.
- Download the latest version of the plugin from
- 2.1. Press the button Download and Get FREE Trial.
- 2.2. Select Ae / Pr as the Host Application.
- 2.3. Select the desired Dehancer plugin.
- 2.4. Select Windows 10 as your Operating System.
- 2.5. Hit Download button. Your download will start automatically.
- Unzip the downloaded zip file, if your system didn’t do it automatically.
- Select the appropriate distributive for CUDA/OpenCL GPU frameworks.
- Run the installation file and follow the installation steps.

- Normally, older plugin versions will be removed during the installation procedure automatically. If the update does not technically allow to maintain settings compatibility, new version will be installed as a separate, independent plugin.
Downloading and installing the plugin / macOS
- Make sure that your computer meets the system requirements for the plugin to work correctly.
- Download the latest version of the plugin from 2.1. Press the button Download and Get FREE Trial. 2.2. Select Ae / Pr as the Host Application. 2.3. Select the desired Dehancer plugin. 2.4. Select macOS as your Operating System. 2.5. Hit Download button. Your download will start automatically.
- Unzip the downloaded zip file, if your system didn’t do it automatically.
- Run the installation file and follow the installation steps.

- Normally, older plugin versions will be removed during the installation procedure automatically. If the update does not technically allow to maintain settings compatibility, new version will be installed as a separate, independent plugin.
GPU render selection [Pr] / Windows
In Adobe Premiere, you need to select the correct GPU engine when you create the New Project to make rendering and preview run at high performance. Otherwise, the system will automatically switch to software renderer, making performance extremely poor. Notice that this setting can only be changed when creating the project.
- In the New Project window go to: General → Video Rendering and Playback → Renderer
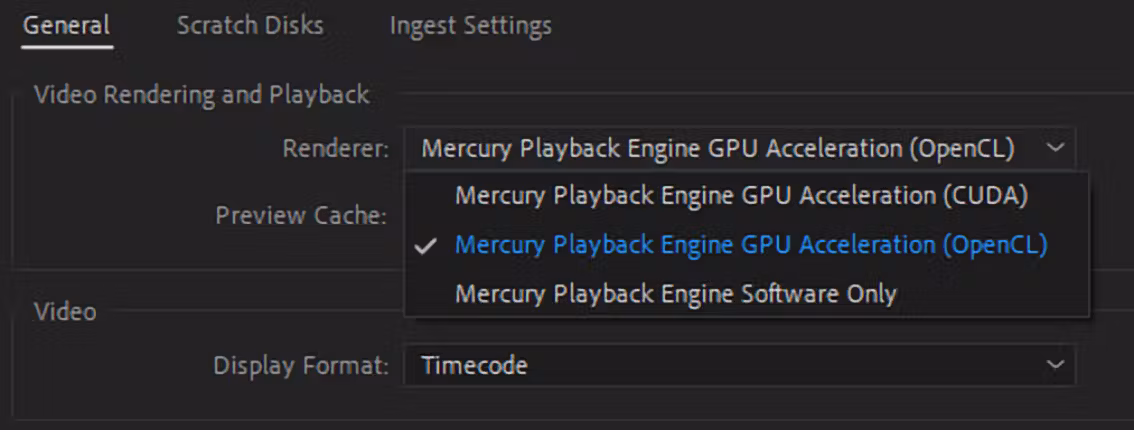
- Select your GPU engine depending on the plugin distributive you used for the installation – CUDA or OpenCL.
GPU render selection [Pr] / macOS
In Adobe Premiere, you need to select the correct GPU engine when you create the New Project to make rendering and preview run at high performance. Otherwise, the system will automatically switch to software renderer, making performance extremely poor. Notice that this setting can only be changed when creating the project.
- In the New Project window go to: General → Video Rendering and Playback → Renderer
- Select the Metal rendering engine.
Downloading Film and Camera Profiles
Before using Dehancer you have to download film and camera profiles.
- At the final step of the installation procedure, the Dehancer Profiles widget will open and the profiles will be downloaded and installed automatically.

- Once the profiles update is complete, close the widget. Now Dehancer is ready to use.
- If for some reason the profiles were not downloaded during the installation, you will need to do it manually.
- 3.1. Apply Dehancer Plugin to any clip or Adjustment layer.
- 3.2. Go to Effect Controls panel → Dehancer, navigate to the bottom of the plugin settings and find the Check Profiles button. This allows you to download or update the profiles at any time.

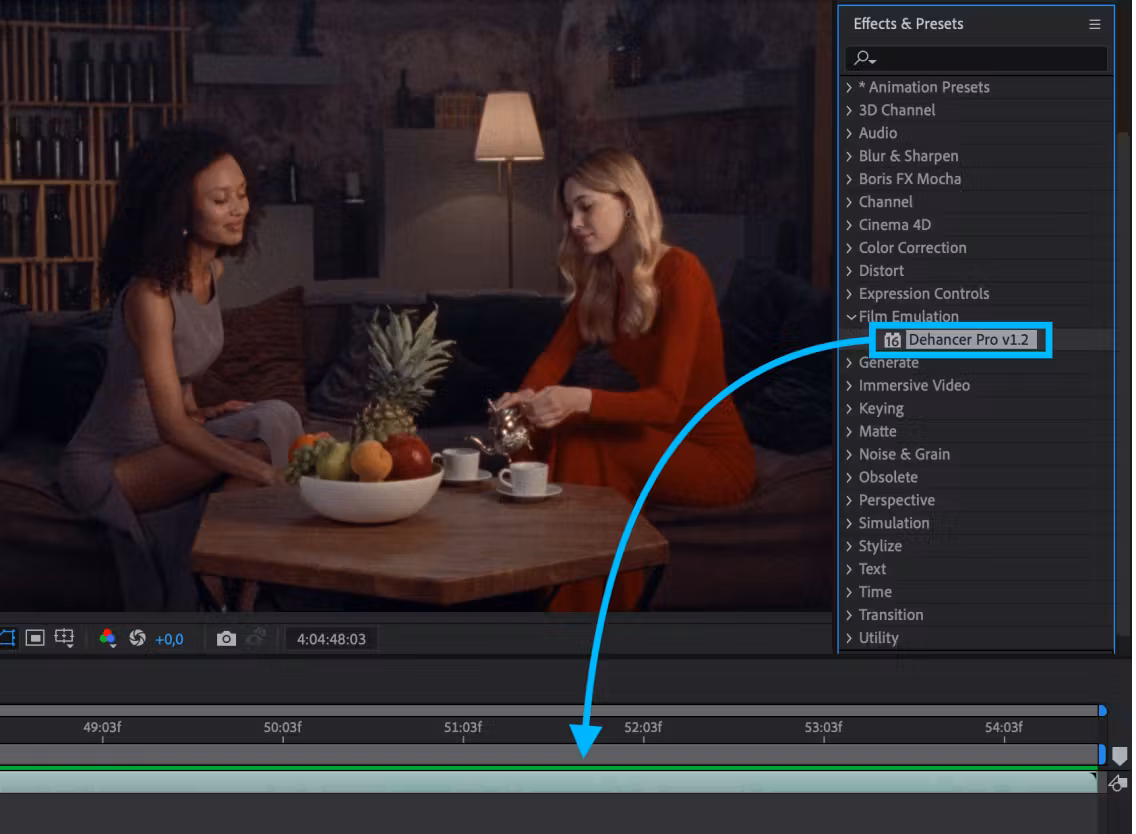
Adding Dehancer to the Project (After Effects)
- After the plugin installation, restart After Effects if it was already running.
- Open a Project.
- Open the Effects & Presets panel (or press Ctrl+5).
- In the Effects & Presets tab, open the Film Emulation group and find Dehancer.
- Select a clip on the timeline, then drag and drop Dehancer to the clip. Also, you can double-click the effect to apply it to the selected clip.

Tip: In the same way, Dehancer can be applied not only to the individual clips, but also to the Adjustment Layers, thus allowing to grade the entire timeline with a single Dehancer instance.
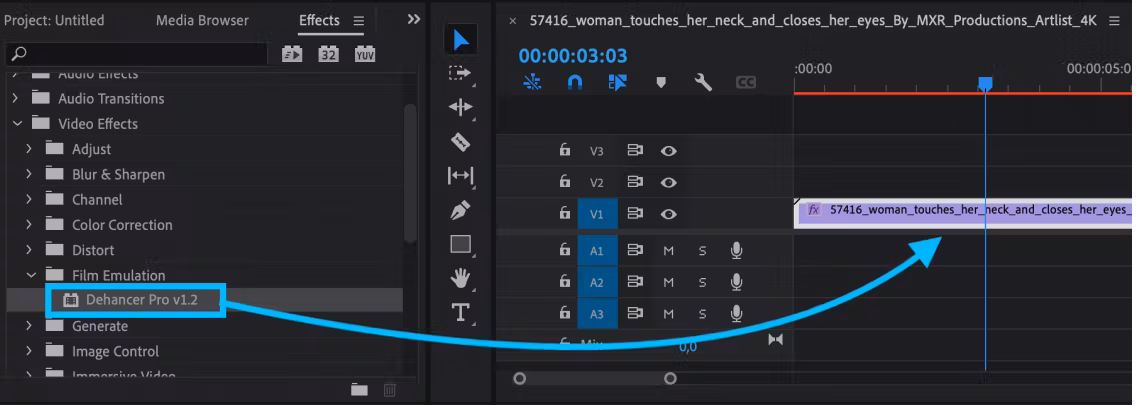
Adding Dehancer to the Project (Premiere Pro)
- After the plugin installation, restart Premiere Pro if it was already running.
- Open a Project.
- Open the Effects panel (or press Shift+7).
- In the Effects tab, open the Video Effects / Film Emulation group and find Dehancer.
- Select a clip on the timeline, then drag and drop Dehancer to the clip. Also, you can double-click the effect to apply it to the selected clip.
Tip: In the same way, Dehancer can be applied not only to the individual clips, but also to the Adjustment Layers, thus allowing to grade the entire timeline with a single Dehancer instance.
Preview and Rendering quality settings (Premiere Pro)
When using Dehancer and other plugins with Adobe Premiere Pro, the Preview and the rendered footage may suffer from posterisation artifacts. This is caused by insufficient bit depth.
Maximum Preview quality:
- In the Premiere menu select Sequence → Sequence Settings.
- In the Video Previews section enable the Maximum Bit Depth checkbox.
- Optionally you can enable the Maximum Render Quality checkbox.
- Then you will get the warning alert, which in most cases can be ignored.
Maximum Render quality:
- Go to the Export tab.
- In the Video / Basic Video Settings enable the Render at Maximum Depth checkbox.
- Optionally you can enable the Use Maximum Render Quality checkbox.
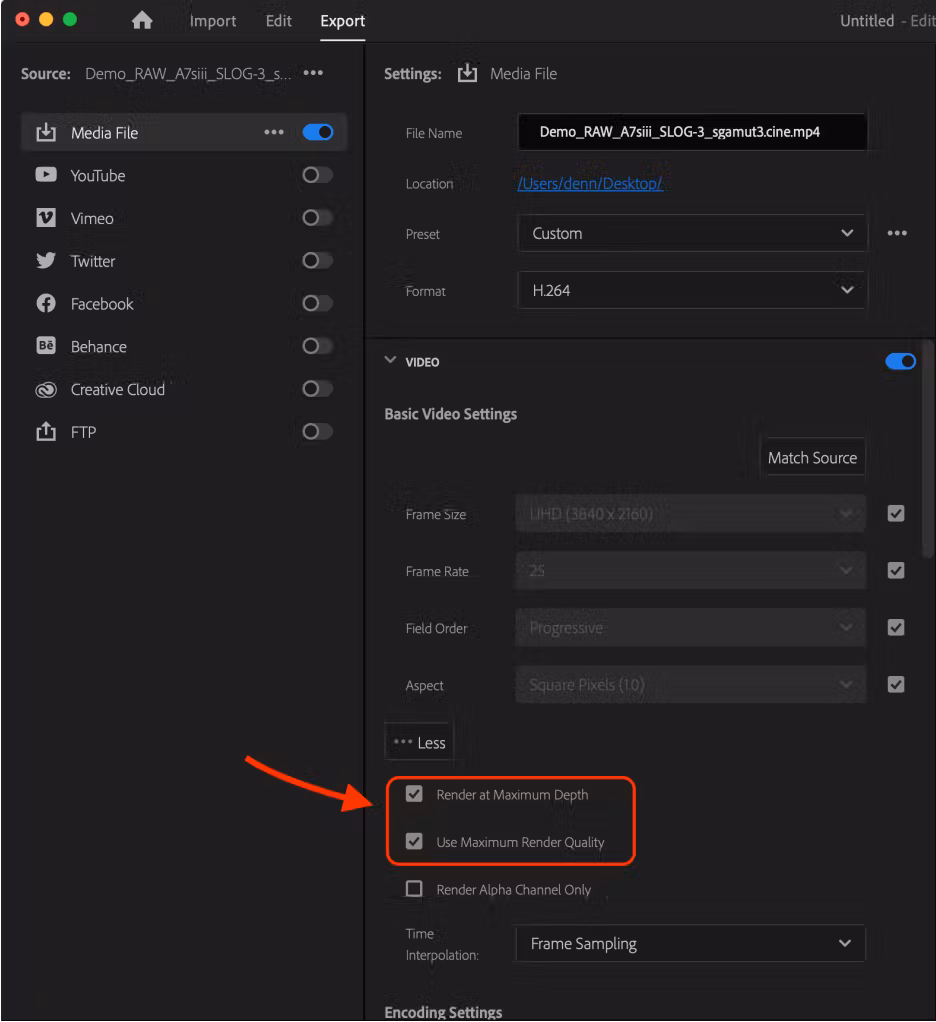
Note: These settings may significantly affect the plugin performance and memory requirements.
CURRENTLY AFFINITY PHOTO SUPPORT HAS BETA STATUS AND MAY BE UNSTABLE. USE AT YOUR OWN RISK. Please follow our instructions carefully to maximize your chances. However, due to the nature of Photoshop plugin support in Affinity, we cannot guarantee the functionality of Dehancer plugin within this host application.
Downloading and installing the plugin / Windows

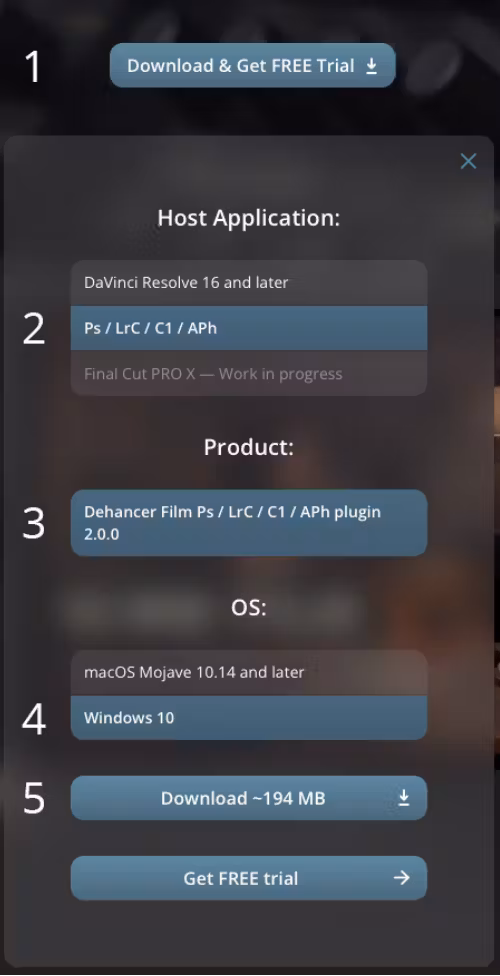
2.1 Press the button Download and Get FREE Trial.
2.2 Select Ps / LrC / C1 / APh as the Host Application.
2.3 Select Dehancer Film Ps / LrC / C1 / APh plugin as the Product.
2.4 Check the Operating System selection.
2.5 Hit Download button. Your download will start automatically.
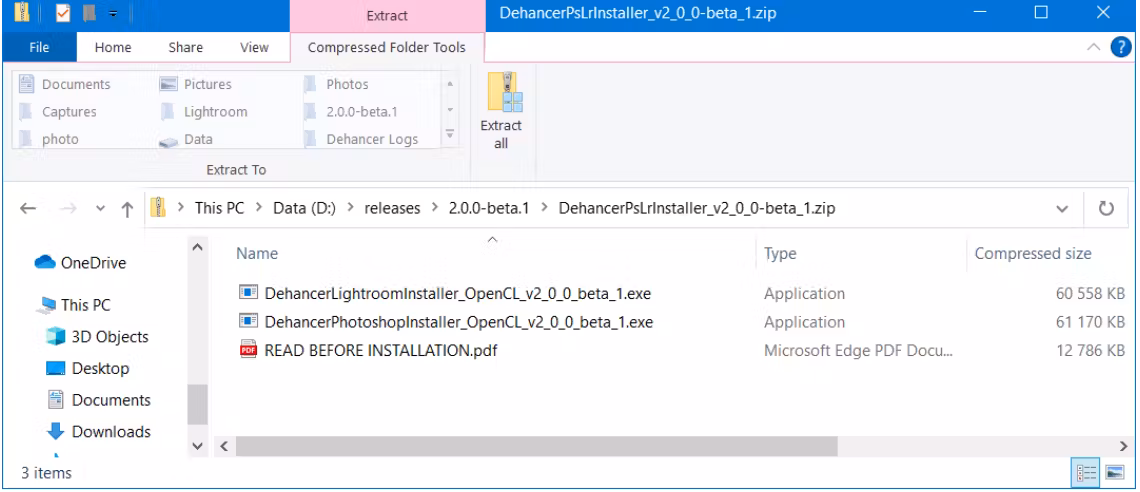
3. Unzip the downloaded zip file, if your system didn’t do it automatically:

💡 ATTENTION! The Adobe Photoshop plugin is used for Affinity Photo installation
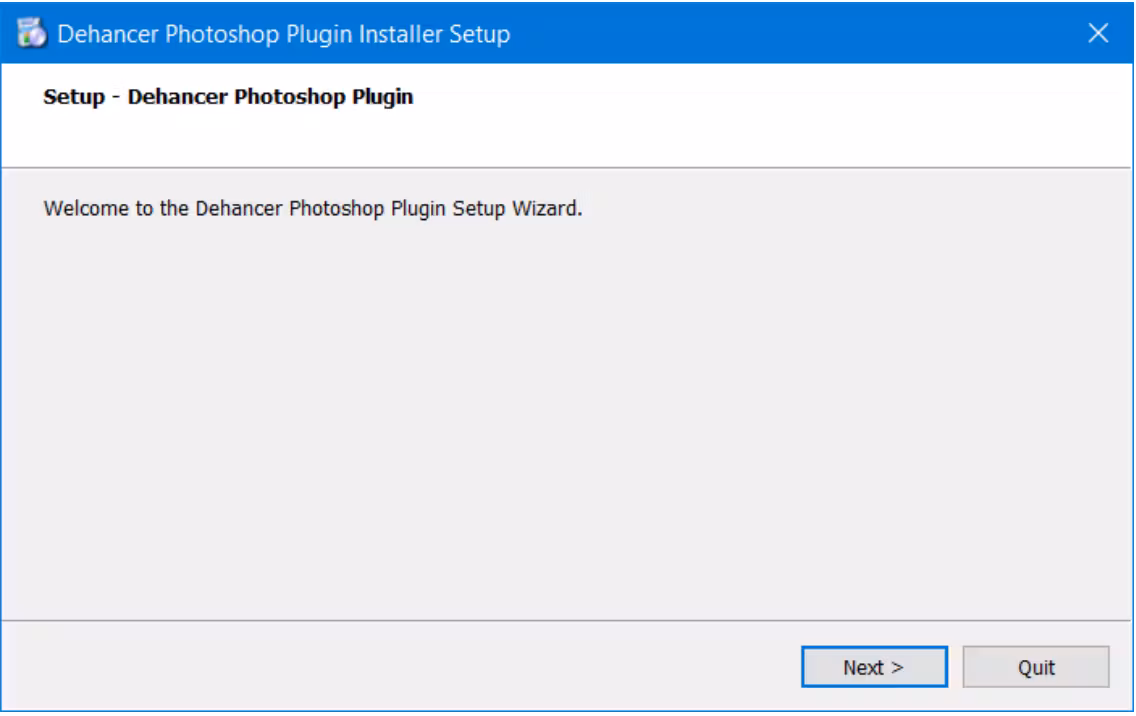
- Run the installation Photoshop installation file and follow the installation steps.

- Launch Affinity Photo. If the program was already running, you don’t need to restart it.
- Open Affinity Photo plugins preferences: Affinity Photo → Preferences → Photoshop Plugins
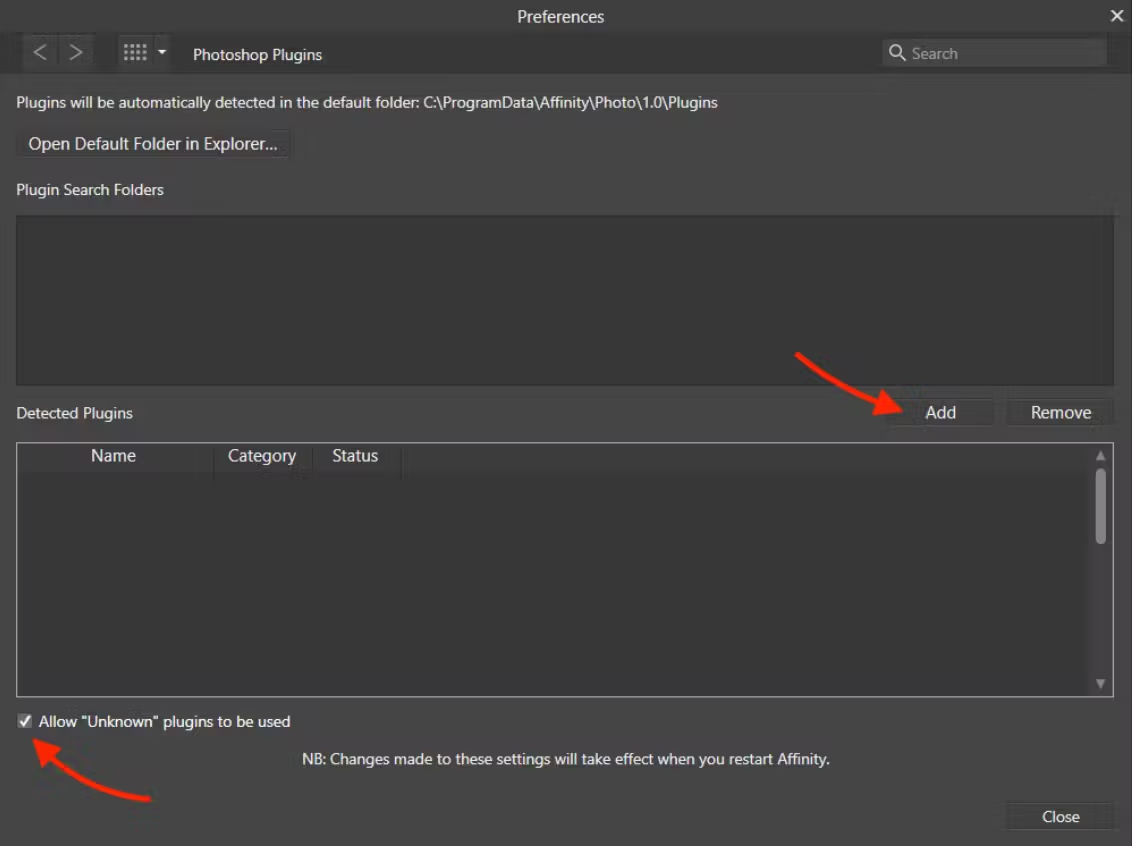
- Click the Add button under the Plugin Search Folders list and specify the installed Dehancer Photoshop plugin location: C:\Program Files\Common Files\Adobe\Plug-Ins\CC\Dehancer
- Enable the checkbox Allow "Unknown" plugins to be used
- Close Preferences and restart Affinity Photo as required.
- After the application is restarted, a new plugin should appear in the list: Filters → Plugins → Dehancer → Dehancer Film

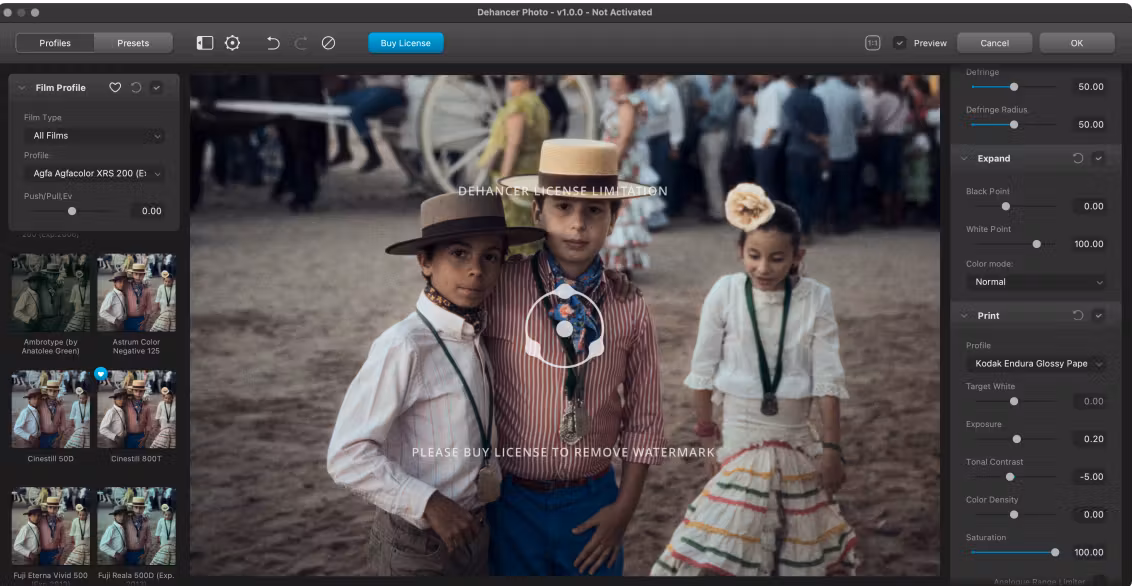
💡 Note that your file must be presented in sRGB color space to be displayed and processed properly. Support for other color spaces will be added later.
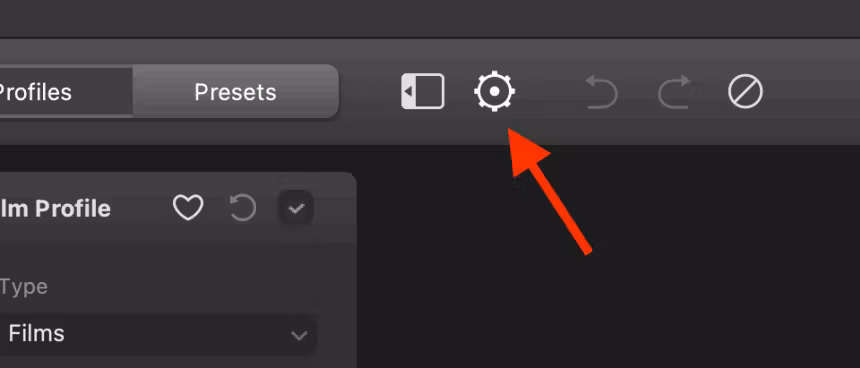
- At first launch, the Settings window will open automatically. You can also open the Settings at any time by clicking on the gear icon in the toolbar.

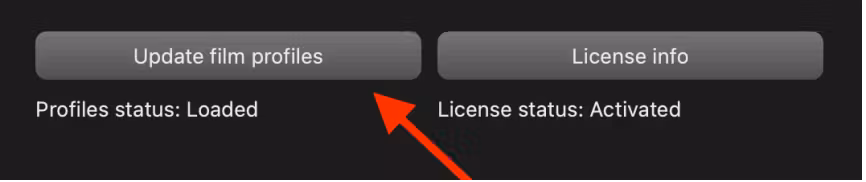
- Use the button Update Film Profiles to download the profiles the first time.

- Now Dehancer is ready to use.
Downloading and installing the plugin / macOS

2.1 Press the button Download and Get FREE Trial.
2.2 Select Ps / LrC / C1 / APh as the Host Application.
2.3 Select Dehancer Film Ps / LrC / C1 / APh plugin as the Product.
2.4 Check the Operating System selection.
2.5 Hit Download button. Your download will start automatically.
- Unzip the downloaded zip file, if your system didn’t do it automatically:
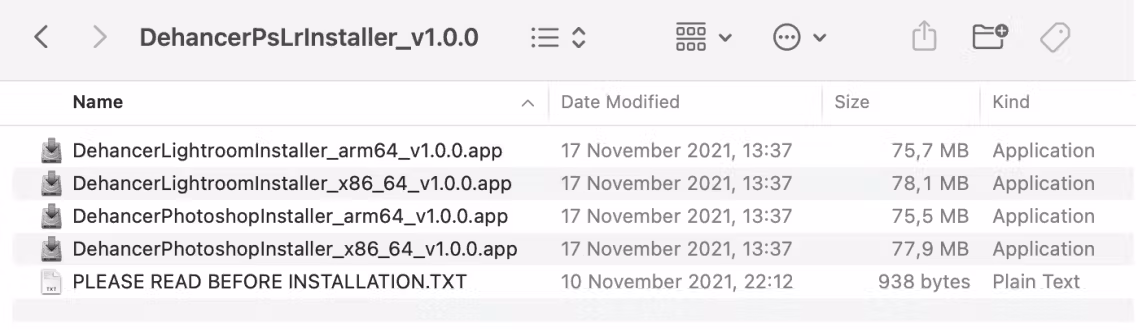
- Select the appropriate distributive. The file name contains the host application (Photoshop or Lightroom) and the compatible CPU type:
- x86 — for Intel-based macs
- arm64 — for Apple Silicon M1/M2
💡 ATTENTION! The Adobe Photoshop plugin is used for Affinity Photo installation
💡 Intel-based macs: Use the x86 Dehancer plugin installation file. Apple Silicon M1/M2 macs: On Apple Silicon macs Affinity Photo must be launched in Rosetta x86 emulation mode to run Dehancer plugin properly. To do this, open the Applications folder, look for the Affinity Photo subfolder, locate Affinity Photo.app and select ‘Get Info’ from the right-click menu (or press Cmd + I). Enable the ‘Open with Rosetta’ option and use the x86 Dehancer plugin installation file.
- Run the Photoshop installation file and follow the installation steps.

- Launch Affinity Photo. If the program was already running, you don’t need to restart it.
- Open Affinity Photo plugins preferences: Affinity Photo → Preferences → Photoshop Plugins
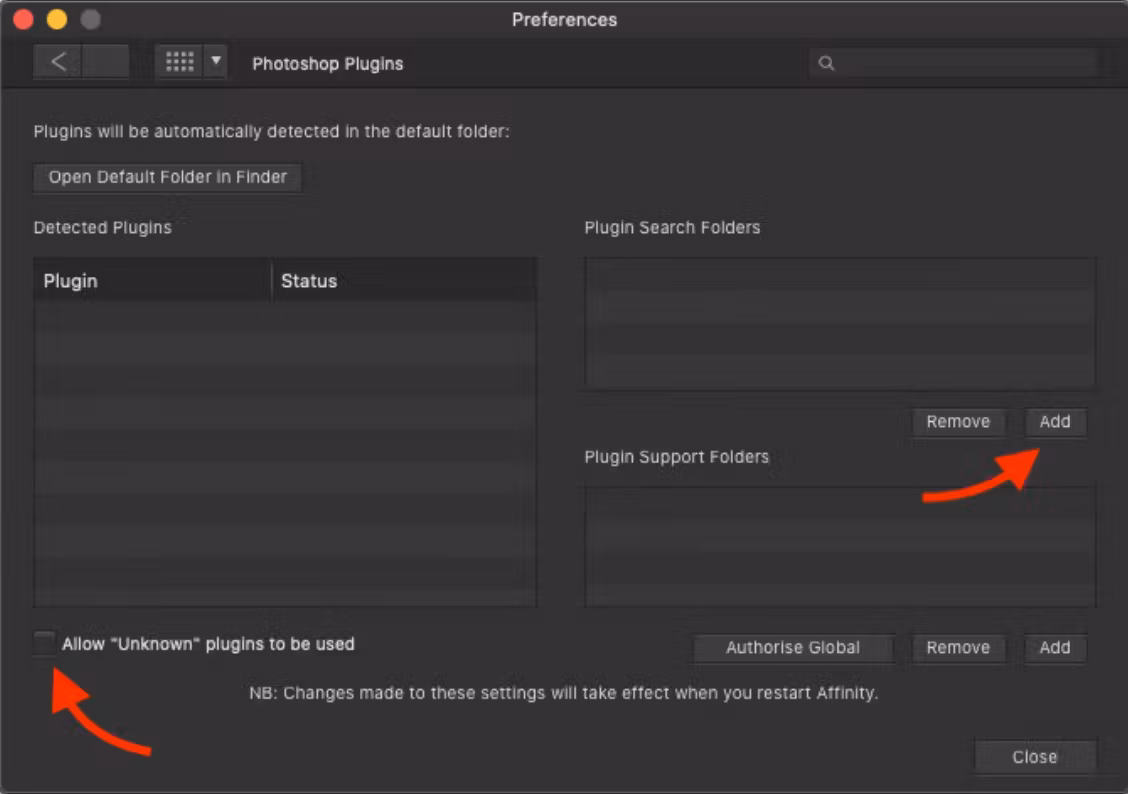
- Click the Add button under the Plugin Search Folders list and specify the installed Dehancer Photoshop plugin location: Macintosh HD/Library/Application Support/Adobe/Plug-Ins/CC/Dehancer
- Enable the checkbox Allow "Unknown" plugins to be used
- Close Preferences and restart Affinity Photo as required.
- After the application is restarted, a new plugin should appear in the list: Filters → Plugins → Dehancer → Dehancer Film

💡 Note that your file must be presented in the sRGB color space to be displayed and processed properly. Support for other color spaces will be added later.
- At first launch, the Settings window will open automatically. You can also open the Settings at any time by clicking on the gear icon in the toolbar.
- Use the button Update Film Profiles to download the profiles the first time.

- Now Dehancer is ready to use.
Working with photos in RAW
RAW files for further editing in Dehancer can be processed in multiple ways:
1. While developing RAW photos in Affinity Photo, we recommend:
- Correct the most severe deviations in exposure and white balance
- Use the linear contrast curve if possible, avoiding clipping in shadows and highlights
- Disable noise reduction and sharpening
- Avoid any local enhancements which might cause visible halos
- Work with developed files in sRGB 16 bit format
- Third-party RAW converters
For instance C1 (Capture One Pro) combined with Linear curve, and RPP (Raw Photo Processor) with Colorimetric Gamma mode produces good results. You can also use any other RAW converter. While processing RAW photos, we recommend:
- Correct the most severe deviations in exposure and white balance
- Use the Linear contrast curve if possible, avoiding clipping in shadows and highlights
- Disable noise reduction and sharpening
- Avoid any local contrast enhancement which might cause visible halos
- Export files in sRGB TIFF 16 bit format
Downloading and installing the plugin / Windows

2.1 Press the button Download and Get FREE Trial.
2.2 Select Ps / LrC / C1 / APh as the Host Application.
2.3 Select Dehancer Film Ps / LrC / C1 / APh plugin as the Product.
2.4 Check the Operating System selection.
2.5 Hit Download button. Your download will start automatically.
- Unzip the downloaded zip file, if your system didn’t do it automatically:

- Run the installation Photoshop .exe file and follow the installation steps.
- Launch or restart Adobe Photoshop if it was already running.
- Open any photo you would like to process with Dehancer.
💡 Note that your file must be presented in sRGB color space to be displayed and processed properly. Support for other color spaces will be added later.
- Select the plugin in the Photoshop menu: Filter → Dehancer → Dehancer Film.
- At first launch, the Settings window will open automatically. You can also open the Settings at any time by clicking on the gear icon in the toolbar.

- Use the button Update Film Profiles to download the profiles the first time.

- Now Dehancer is ready to use.
- Downloading and installing the plugin / macOS
- Make sure that your computer meets the system requirements for the plugin to work correctly.
- Download the latest version of the plugin from

2.1 Press the button Download and Get FREE Trial.
2.2 Select Ps / LrC / C1 / APh as the Host Application.
2.3 Select Dehancer Film Ps / LrC / C1 / APh plugin as the Product.
2.4 Check the Operating System selection.
2.5 Hit Download button. Your download will start automatically.
- Unzip the downloaded zip file, if your system didn’t do it automatically:

- Select the appropriate distributive. The file name contains the host application (Photoshop or Lightroom) and the compatible CPU type:
- x86 — for Intel-based macs
- arm64 — for Apple Silicon M1/M2
💡 Apple Silicon M1/M2 macs can run Ps/LrC in two modes:
- As a native Apple Silicon application (an updated Ps/LrC version is required).
- In Rosetta x86 emulation mode (an older Ps/LrC version is installed, or ‘Open with Rosetta’ option is enabled manually). To check what mode Photoshop is running in, start the application, run Activity Monitor.app and check the Kind column.
- If it shows ‘Apple’, then Ps/LrC runs as a native application. In this case, please install the arm64 version of the plugin.
- If it says ‘Intel’, the application is launched in emulation mode. This requires the x86 version of the plugin. You can also check if the emulation mode is enabled manually. To do this, open the Applications folder, look for the Adobe Lightroom subfolder, locate Adobe Lightroom.app and select ‘Get Info’ from the right-click menu (or press Cmd + I). ‘Open with Rosetta’ option stands for the emulation mode.
- Run the Photoshop installation file and follow the installation steps.

- Launch or restart Adobe Photoshop if it was already running.
- Open any photo you would like to process with Dehancer.
💡 Note that your file must be presented in the sRGB color space to be displayed and processed properly. Support for other color spaces will be added later.
- Select the plugin in the Photoshop menu: Filter → Dehancer → Dehancer Film.
- At first launch, the Settings window will open automatically. You can also open the Settings at any time by clicking on the gear icon in the toolbar.

- Use the button Update Film Profiles to download the profiles the first time.

- Now Dehancer is ready to use.
Working with photos in RAW
RAW files for further editing in Dehancer can be processed in multiple ways:
- Using the Photoshop/Lightroom built-in engine
(ACR – Adobe Camera RAW)
We have observed that color rendering in ACR / Lightroom leaves much to be desired, but an acceptable result can be obtained with the following settings:
Profile: Adobe Standard
Exposure: –1
Contrast: –40
Blacks: +60
Curve: Linear
Sharpening = 0
Noise Reduction = 0
Color Space: sRGB IEC61966-2.1
Bit Depth: 16 bit
If you are shooting with an iPhone and using Apple ProRaw DNG, try setting the Amount value for the Apple ProRaw profile to zero. Thus you will reduce the automatic Apple algorithms that are not always reliable (but still, sometimes acceptable). Meanwhile, we recommend setting the Sharpening value in the Detail tab to zero in order to prevent oversharpening.
💡 Tip: Any RAW photo can be opened with the Open As Object option. The smart object will be created and Dehancer will be applied as a Smart Filter, which allows you to easily access both the RAW settings and the plugin’s parameters at any time.
- Third-party RAW converters
- For instance C1 (Capture One Pro) combined with Linear curve, and RPP (Raw Photo Processor) with Colorimetric Gamma mode produces good results. You can also use any other RAW converter.
- While processing RAW photos, we recommend:
- Correct the most severe deviations in exposure and white balance
- Use the Linear contrast curve if possible, avoiding clipping in shadows and highlights
- Disable noise reduction and sharpening
- Avoid any local contrast enhancement which might cause visible halos • Export files in sRGB TIFF 16 bit format
Downloading and installing the plugin / Windows

2.1 Press the button Download and Get FREE Trial.
2.2 Select Ps / LrC / C1 / APh as the Host Application.
2.3 Select Dehancer Film Ps / LrC / C1 / APh plugin as the Product.
2.4 Check the Operating System selection.
2.5 Hit Download button. Your download will start automatically.
- Unzip the downloaded zip file, if your system didn’t do it automatically:

💡 ATTENTION! The Lightroom plugin is used for Capture One installation
- Run the installation Lightroom.exe file and follow the installation steps.

- Launch Capture One. If the program was already running, you don’t need to restart it.
- Right Click on any photo in your Catalog and select Edit With → Other…

- Specify the path to the installed Dehancer plugin: C:\Program Files\Dehancer Lightroom Plugin\DehancerLightroom.exe

- Now Dehancer Lightroom Plugin will appear in the external editors list.
💡 Note that your file must be presented in the sRGB color space to be displayed and processed properly. Support for other color spaces will be added later
- In the following dialogue, select the appropriate options:
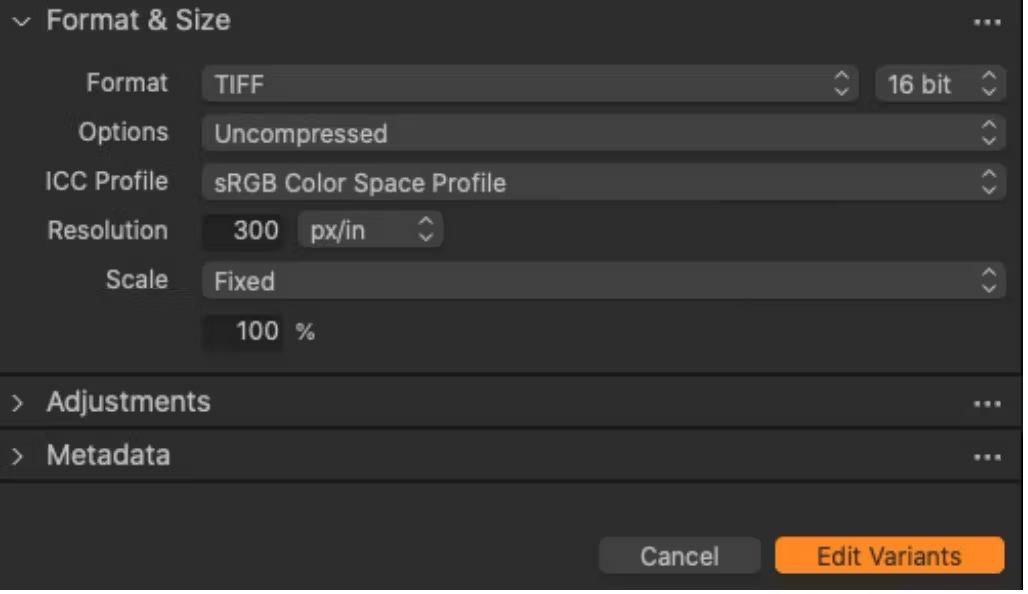
- TIFF 16 bit
- sRGB Color Space Profile
Hit the Edit Variants button, then the plugin will open.
- At first launch, the Settings window will open automatically. You can also open the Settings at any time by clicking on the gear icon in the toolbar.

- Use the button Update Film Profiles to download the profiles the first time.

- Now Dehancer is ready to use.
Downloading and installing the plugin / macOS
2.1 Press the button Download and Get FREE Trial.
2.2 Select Ps / LrC / C1 / APh as the Host Application.
2.3 Select Dehancer Film Ps / LrC / C1 / APh plugin as the Product.
2.4 Check the Operating System selection.
2.5 Hit Download button. Your download will start automatically.
- Unzip the downloaded zip file, if your system didn’t do it automatically:

- Select the appropriate distributive. The file name contains the host application (Photoshop or Lightroom) and the compatible CPU type:
- x86 — for Intel-based macs
- arm64 — for Apple Silicon M1/M2
💡 ATTENTION! The Lightroom plugin is used for Capture One installation
- Run the Lightroom installation file and follow the installation steps.

- Launch Capture One. If the program was already running, you don’t need to restart it.
- Right Click on any photo in your Catalog and select Edit With → Other…

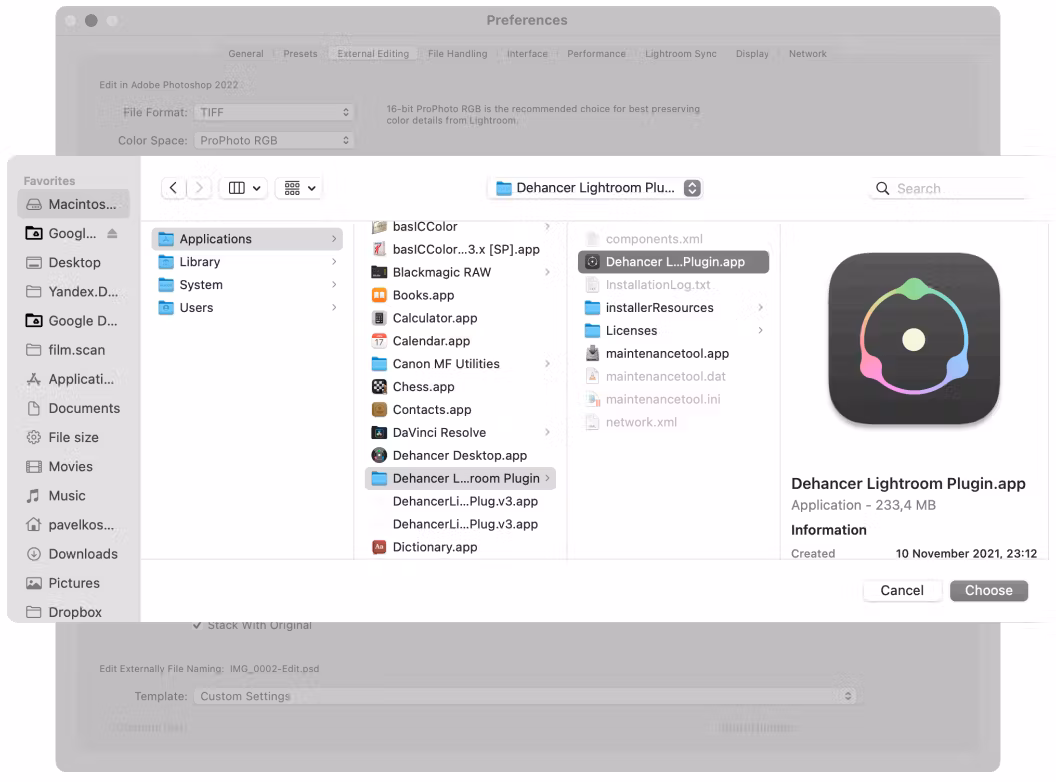
- Specify the path to the installed Dehancer plugin: Macintosh HD → Applications → Dehancer Lightroom Plugin → → Dehancer Lightroom Plugin.app
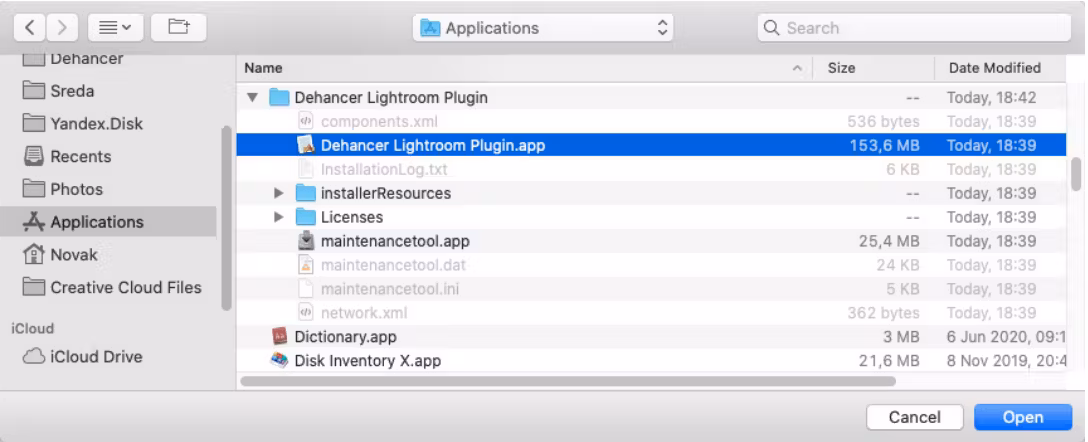
Now Dehancer Lightroom Plugin will appear in the external editors list.
💡 Note that your file must be presented in the sRGB color space to be displayed and processed properly. Support for other color spaces will be added later.
- In the following dialogue, select the appropriate options:
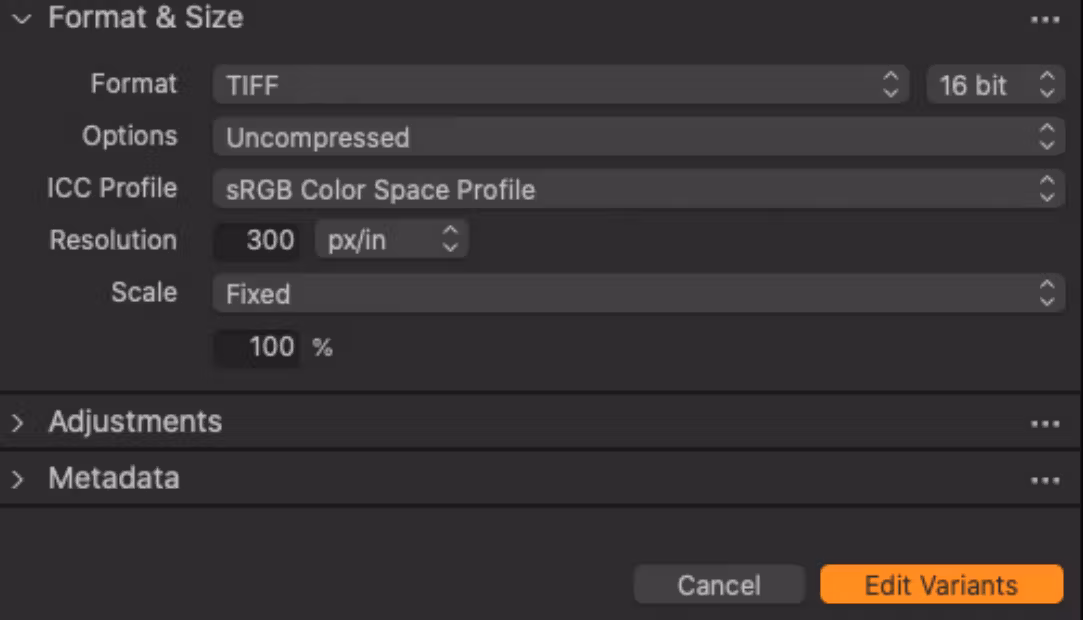
- TIFF 16 bit
- sRGB Color Space Profile
Hit the Edit Variants button, then the plugin will open.
- At first launch, the Settings window will open automatically. You can also open the Settings at any time by clicking on the gear icon in the toolbar.

- Use the button Update Film Profiles to download the profiles the first time.

- Now Dehancer is ready to use.
Working with photos in RAW
RAW files for further editing in Dehancer can be processed in multiple ways:
- Using the Photoshop/Lightroom built-in engine
- (ACR – Adobe Camera RAW)
- We have observed that color rendering in ACR / Lightroom leaves much to be desired, but an acceptable result can be obtained with the following settings:
Profile: Adobe Standard
Exposure: –1
Contrast: –40
Blacks: +60
Curve: Linear
Sharpening = 0
Noise Reduction = 0
Color Space: sRGB IEC61966-2.1
Bit Depth: 16 bit
If you are shooting with an iPhone and using Apple ProRaw DNG, try setting the Amount value for the Apple ProRaw profile to zero. Thus you will reduce the automatic Apple algorithms that are not always reliable (but still, sometimes acceptable). Meanwhile, we recommend setting the Sharpening value in the Detail tab to zero in order to prevent oversharpening.
💡 Tip: Any RAW photo can be opened with the Open As Object option. The smart object will be created and Dehancer will be applied as a Smart Filter, which allows you to easily access both the RAW settings and the plugin’s parameters at any time.
- Third-party RAW converters
- For instance C1 (Capture One Pro) combined with Linear curve, and RPP (Raw Photo Processor) with Colorimetric Gamma mode produces good results. You can also use any other RAW converter. While processing RAW photos, we recommend:
- Correct the most severe deviations in exposure and white balance
- Use the Linear contrast curve if possible, avoiding clipping in shadows and highlights
- Disable noise reduction and sharpening
- Avoid any local contrast enhancement which might cause visible halos • Export files in sRGB TIFF 16 bit format
Downloading and installing the plugin / Windows
2.1 Press the button Download and Get FREE Trial.
2.2 Select Ps / LrC / C1 / APh as the Host Application.
2.3 Select Dehancer Film Ps / LrC / C1 / APh plugin as the Product.
2.4 Check the Operating System selection.
2.5 Hit Download button. Your download will start automatically.
- Unzip the downloaded zip file, if your system didn’t do it automatically:
- Run the installation Lightroom.exe file and follow the installation steps.

- Launch Adobe Lightroom. If the program was already running, you don’t need to restart it.
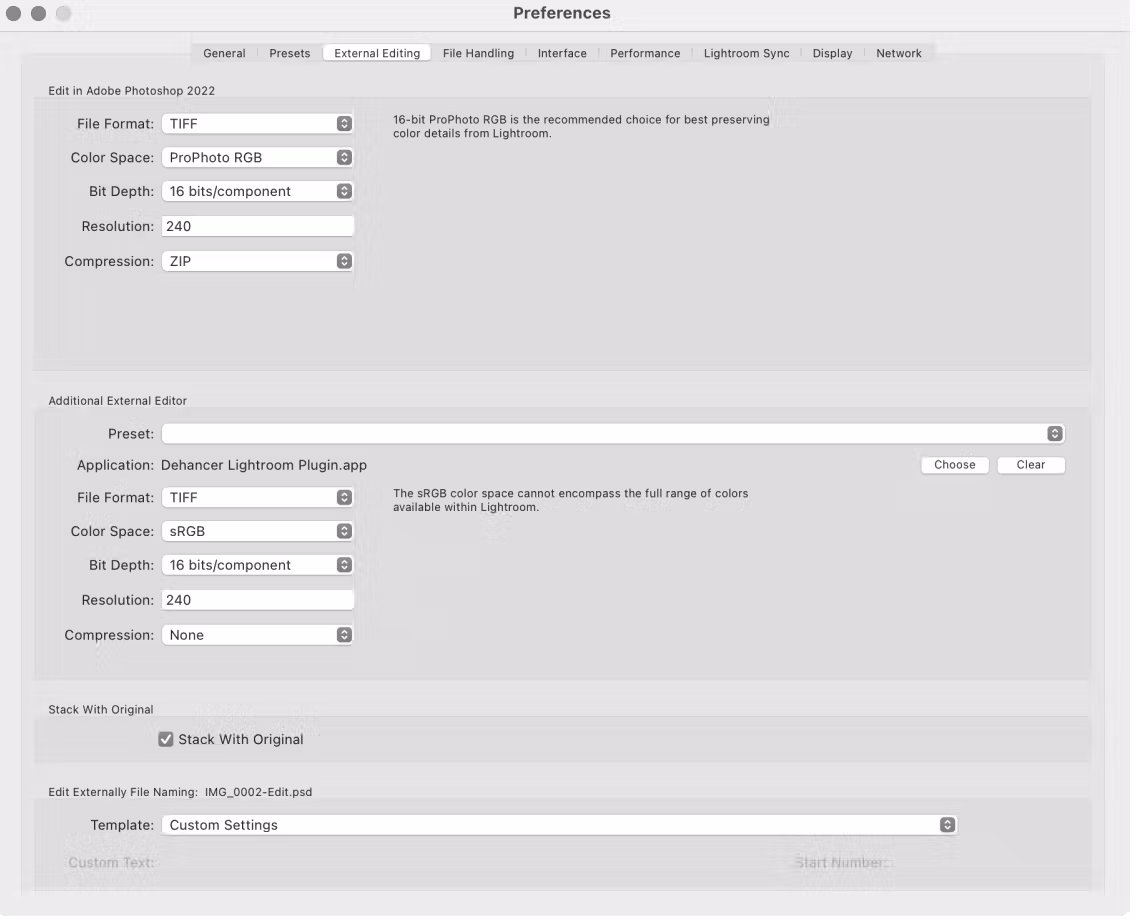
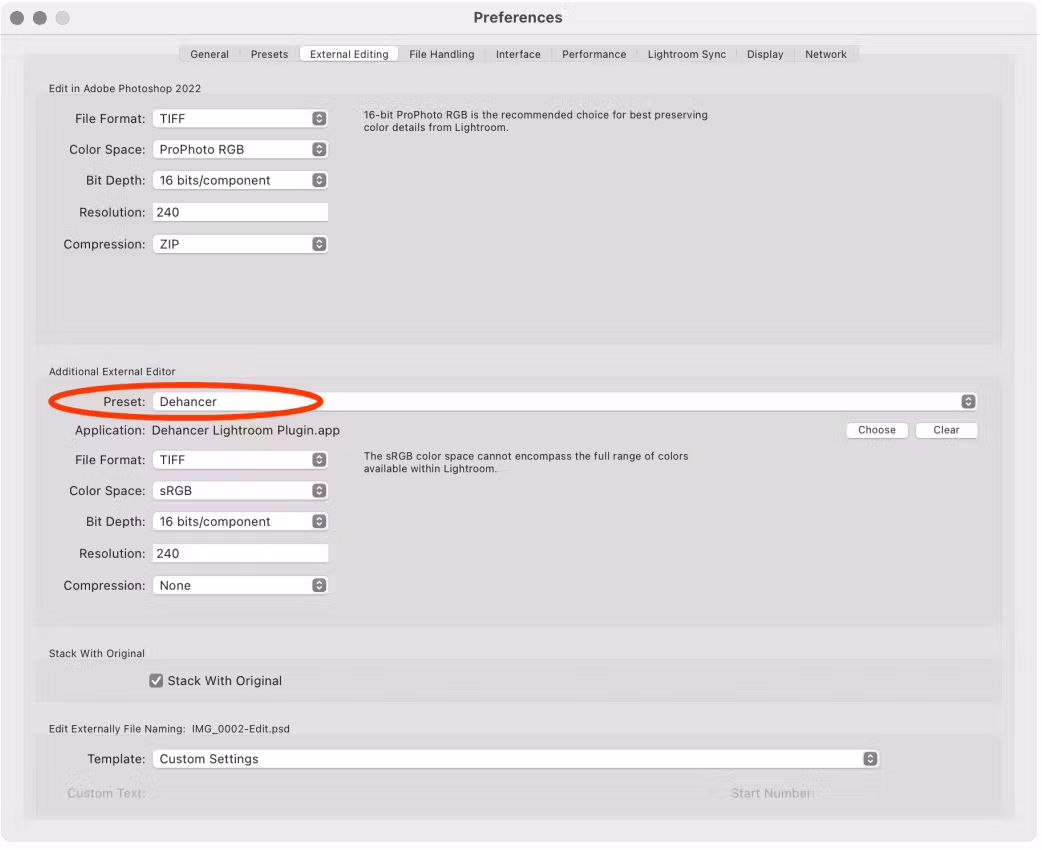
- Go to Preferences → External Editing and click Choose to add Dehancer as an external editor.
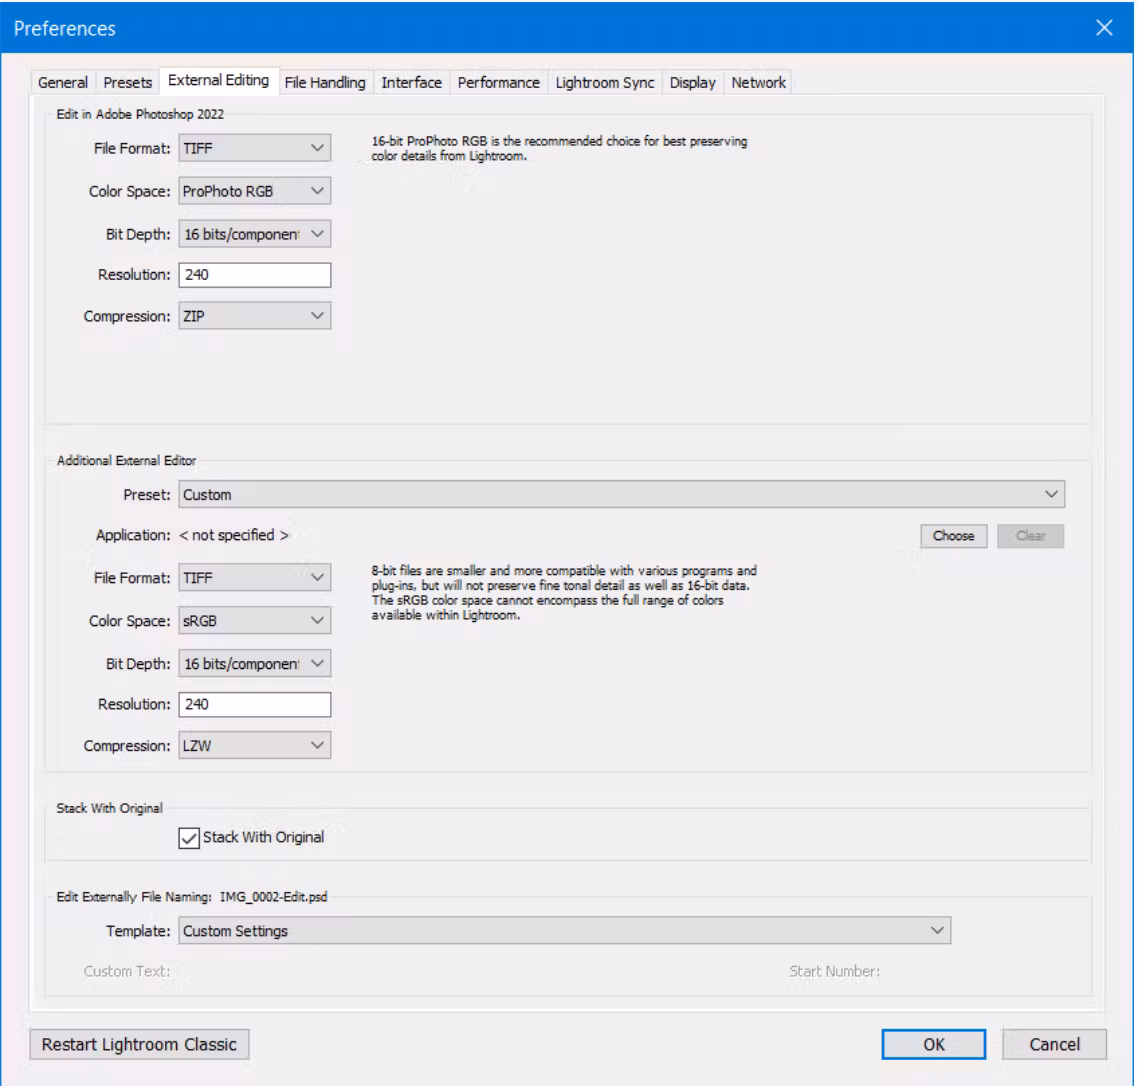
- Specify the path to the installed Dehancer plugin: C:\Program Files\Dehancer Lightroom Plugin\DehancerLightroom.exe

- Make sure that the plug-in is selected as an external editor

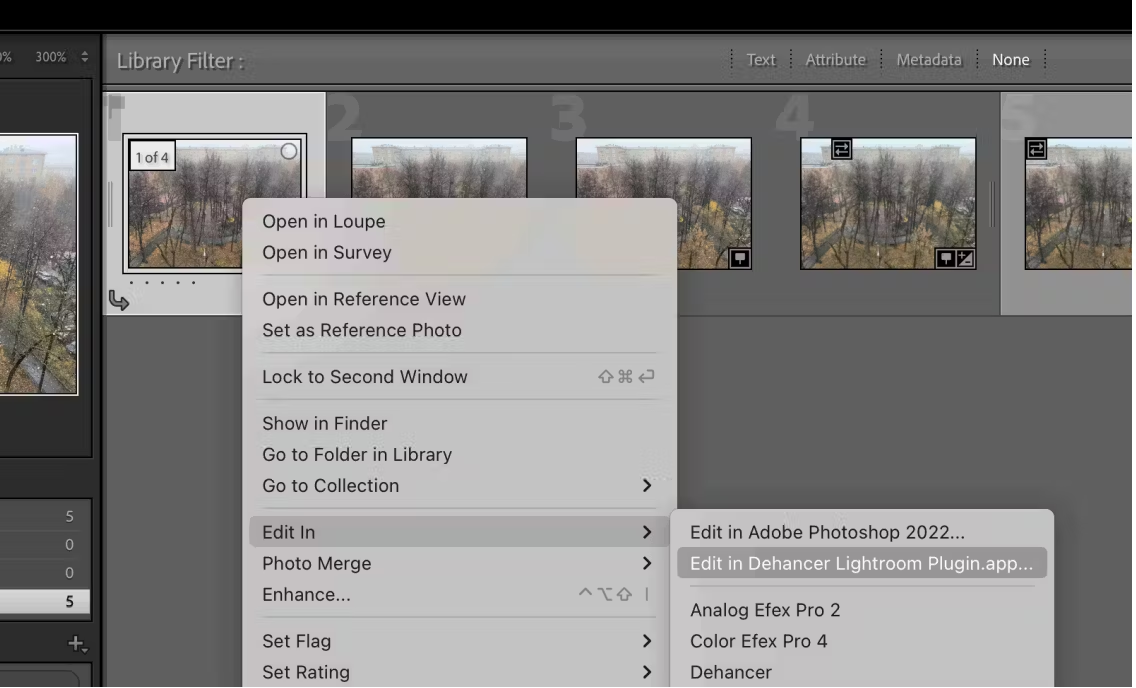
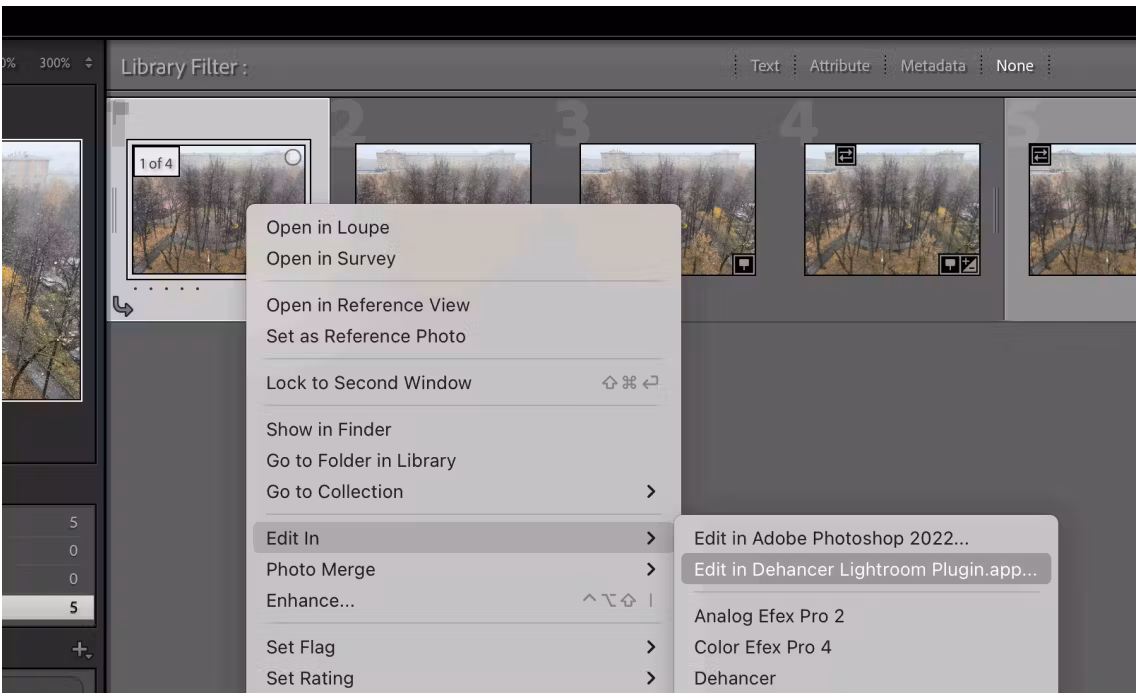
- Choose the photo you want to process, right-click on it and select the Dehancer plugin.
- At first launch, the Settings window will open automatically. You can also open the Settings at any time by clicking on the gear icon in the toolbar.
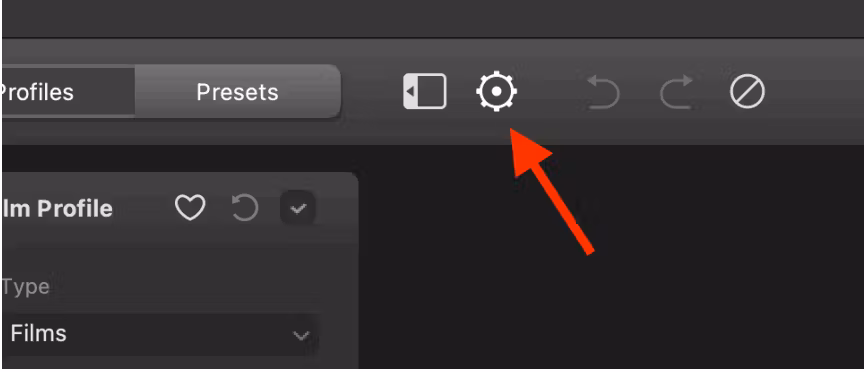
- Use the button Update Film Profiles to download the profiles the first time.

- Now Dehancer is ready to use.
Downloading and installing the plugin / macOS

2.1 Press the button Download and Get FREE Trial.
2.2 Select Ps / LrC / C1 / APh as the Host Application.
2.3 Select Dehancer Film Ps / LrC / C1 / APh plugin as the Product.
2.4 Check the Operating System selection.
2.5 Hit Download button. Your download will start automatically.
- Unzip the downloaded zip file, if your system didn’t do it automatically:

- Select the appropriate distributive. The file name contains the host application (Photoshop or Lightroom) and the compatible CPU type:
- x86 — for Intel-based macs
- arm64 — for Apple Silicon M1/M2
💡 Apple Silicon M1/M2 macs can run Ps/LrC in two modes:
- As a native Apple Silicon application (an updated Ps/LrC version is required).
- In Rosetta x86 emulation mode (an older Ps/LrC version is installed, or ‘Open with Rosetta’ option is enabled manually). To check what mode Photoshop is running in, start the application, run Activity Monitor.app and check the Kind column.
- If it shows ‘Apple’, then Ps/LrC runs as a native application. In this case, please install the arm64 version of the plugin.
- If it says ‘Intel’, the application is launched in emulation mode. This requires the x86 version of the plugin. You can also check if the emulation mode is enabled manually. To do this, open the Applications folder, look for the Adobe Lightroom subfolder, locate Adobe Lightroom.app and select ‘Get Info’ from the right-click menu (or press Cmd + I). ‘Open with Rosetta’ option stands for the emulation mode. </aside>
- Run the Lightroom installation file and follow the installation steps.
- Launch Adobe Lightroom. If the program was already running, you don’t need to restart it.
- Go to Preferences → External Editing and click Choose to add Dehancer as an external editor.
- Specify the path to the installed Dehancer plugin: Macintosh HD → Applications → Dehancer Lightroom Plugin → → Dehancer Lightroom Plugin.app
- Make sure that the plug-in is selected as an external editor.
- Choose the photo you want to process, right-click on it and select the Dehancer plugin.
💡 Note that your file must be presented in the sRGB color space to be displayed and processed properly. Support for other color spaces will be added later.
- At first launch, the Settings window will open automatically. You can also open the Settings at any time by clicking on the gear icon in the toolbar.

- Use the button Update Film Profiles to download the profiles the first time.
- Now Dehancer is ready to use.
Working with photos in RAW
RAW files for further editing in Dehancer can be processed in multiple ways:
- Using the Photoshop/Lightroom built-in engine
- (ACR – Adobe Camera RAW)
- We have observed that color rendering in ACR / Lightroom leaves much to be desired, but an acceptable result can be obtained with the following settings:
Profile: Adobe Standard
Exposure: –1
Contrast: –40
Blacks: +60
Curve: Linear
Sharpening = 0
Noise Reduction = 0
Color Space: sRGB IEC61966-2.1
Bit Depth: 16 bit
If you are shooting with an iPhone and using Apple ProRaw DNG, try setting the Amount value for the Apple ProRaw profile to zero. Thus you will reduce the automatic Apple algorithms that are not always reliable (but still, sometimes acceptable). Meanwhile, we recommend setting the Sharpening value in the Detail tab to zero in order to prevent oversharpening.
💡 Tip: Any RAW photo can be opened with the Open As Object option. The smart object will be created and Dehancer will be applied as a Smart Filter, which allows you to easily access both the RAW settings and the plugin’s parameters at any time.
Third-party RAW converters For instance C1 (Capture One Pro) combined with Linear curve, and RPP (Raw Photo Processor) with Colorimetric Gamma mode produces good results. You can also use any other RAW converter. While processing RAW photos, we recommend:
- Correct the most severe deviations in exposure and white balance
- Use the Linear contrast curve if possible, avoiding clipping in shadows and highlights
- Disable noise reduction and sharpening
- Avoid any local contrast enhancement which might cause visible halos
- Export files in sRGB TIFF 16 bit format
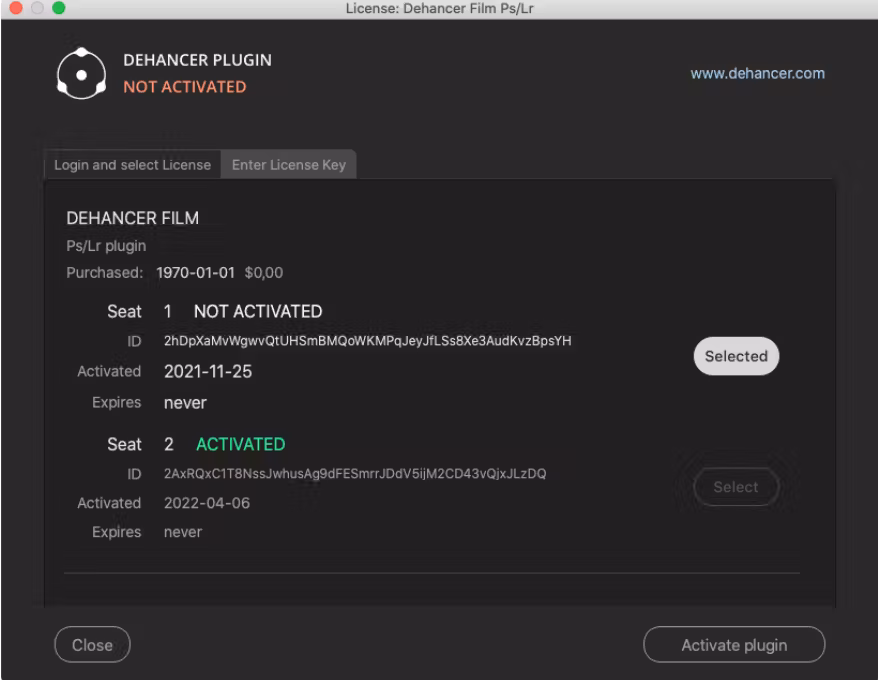
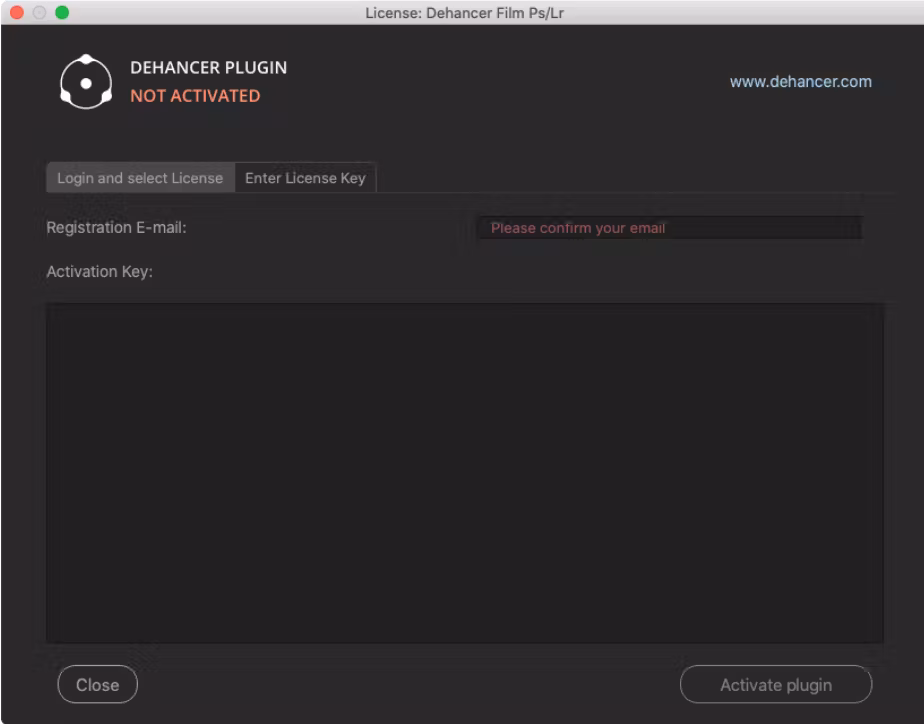
License activation
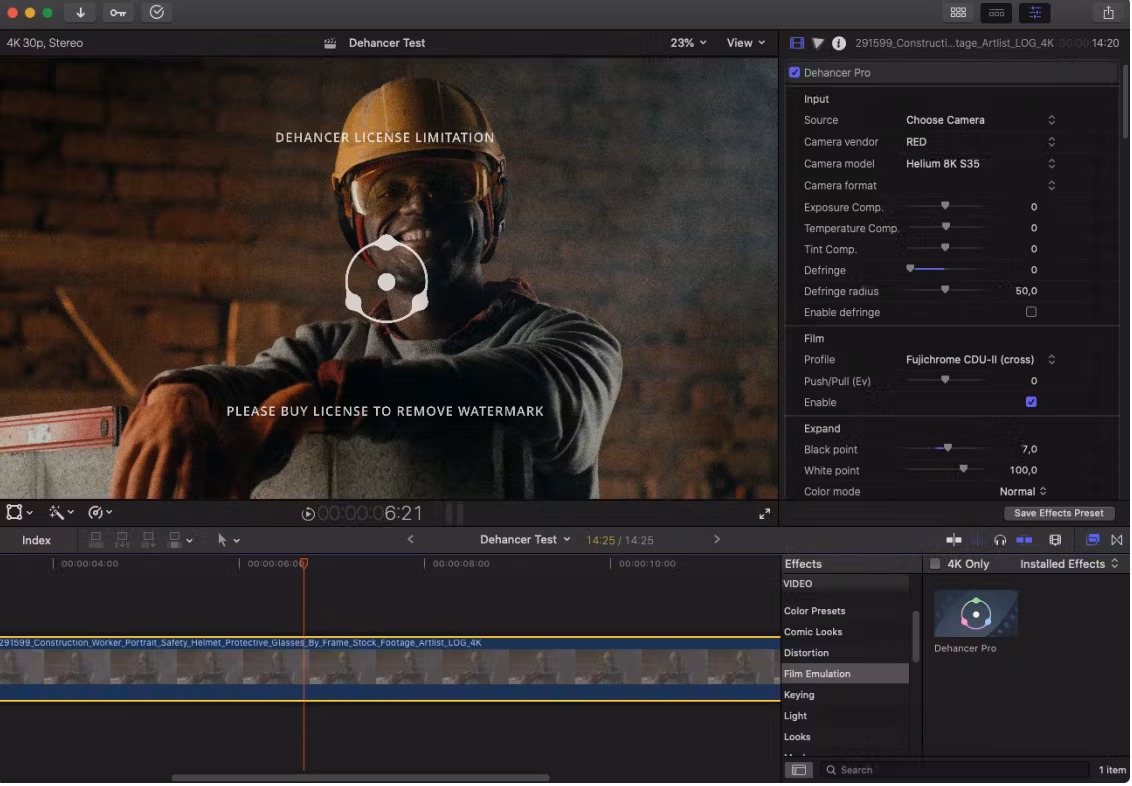
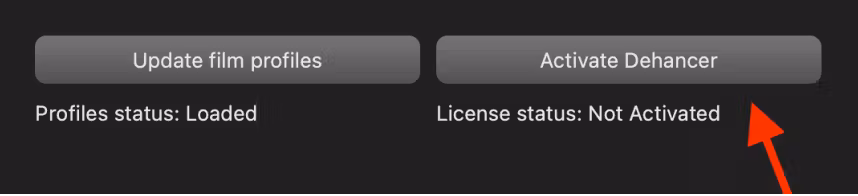
When the plugin is not activated:
• The watermark is applied to the preview and to the rendered footage • The Lut Generator is disabled
To get rid of the watermark and to enable the Lut Generator tool, please activate the plugin. Notice that Lut Generator requires the FULL Dehancer Pro license and is not working with Trial License Keys or Dehancer Lite.
- To remove the watermark, buy the License or get the free 2-week trial on our website. The License will be automatically sent to your account email and displayed in your User Profile as well.
Each License contains Activation Keys for two workstations (seats). Each Key activates both plugins – Adobe Photoshop and Adobe Lightroom.
- Launch the Activation widget.
- There are two options available:
Login and select License
- Login with your Dehancer account.
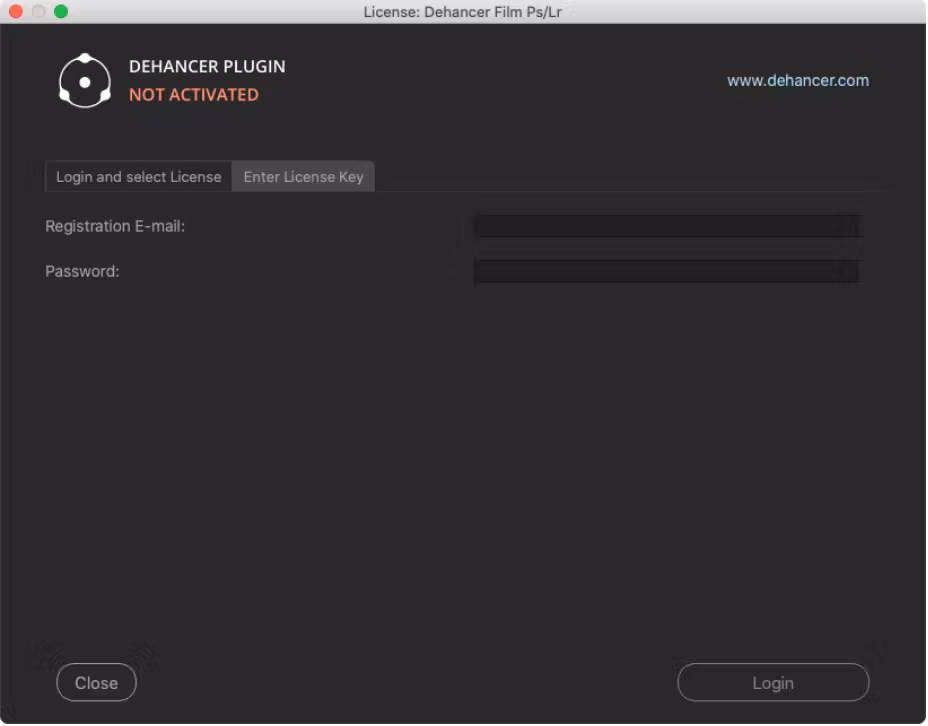
- You will be presented with a list of Licenses available for your product. Select a Seat from the list, then press Activate plugin:
Enter License Key
Paste your registration e-mail and Activation Key from the letter you’ve received after purchasing the License. Press Activate plugin.
3. Enjoy!
💡 Please Notice:
- Internet connection is required for Activation.
- Activation via Login doesn’t work with Beta Licenses.
- Please don’t forget to Deactivate from within the plugin interface BEFORE selling your computer, migrating or reinstalling the System.
Dehancer Updates
We update the plugin regularly, adding new features, fixing bugs and improving performance. Keep Dehancer up-to-date to get the most out of it.
💡 We recommend that you AVOID UPDATING both the plugin itself and the host application until you are finished working on the important projects.
Checking the Updates
Please, check the actual product version in the ‘Download and Get Free Trial’ widget at the . If the new version is out, download and install it manually. We always announce new versions on social media and newsletters, so stay tuned.
Minor Updates and hotfixes
Minor update replaces the existing plugin installation, keeping the node settings compatible and the current License Seat activated. Generally, Dehancer settings in existing projects are not affected, but this depends on many factors, including DaVinci version, operating system and the entire processing chain. Thus, avoid updating the plugin while you are working on a project.
Major Updates
Major updates usually include new features and other changes that does not technically allow to maintain the plugin settings compatibility. New major version will be installed as a separate, independent plugin. It will not be compatible with an old plugin node settings and requires separate License Activation. You can use a spare Seat or just Deactivate an older version to re-use the existing License Key.
BETA Updates
- Major BETA versions are installed as the separate plugins.
- Minor BETA versions will replace earlier releases. Generally the settings are not compatible with the stable release and the plugin requires separate License Activation. You can use a spare Seat or just Deactivate an older version to use the existing License Key for beta testing purposes.
Uninstall Dehancer OFX Plugin (Windows)
- Deactivate all your plugins (use ‘License Info’ button inside the plugin, then press ‘Deactivate’).
- Use the regular Windows uninstall procedure: • Go to Control Panel → Programs → Programs and Features • Press and hold (or right-click) on the plugin you want to remove and select Uninstall or Uninstall/Change
💡 Attention! Using the built-in Windows Uninstaller for Dehancer versions up to 4.1 may lead to unexpected results. Use at own risk.
Uninstall Dehancer OFX Plugin (macOS)
- Deactivate the plugin you are going to remove (use ‘License Info’ button inside the plugin, then press ‘Deactivate’).
- Go to /Library/OFX/Plugins/ directory on your Mac.
- Choose plugin you are going to remove.
- Right-click on the plugin and choose Show Package Content.
- Run the maintenancetool.app application.
- Choose Remove All Components, click Continue and follow uninstall steps.
- Go to /Users/{user}/Library/Application Support/ directory on your Mac.
- Delete all the files corresponding to the plugins you are willing to remove.
Uninstall Dehancer Plugin for Final Cut Pro (Windows)
- Deactivate all plugins you are going to remove (use ‘License Info’ button inside the plugin, then press ‘Deactivate’).
- Delete the corresponding plugin folders: /Applications/Dehancer Pro FCP.app ~/Movies/Motion Templates/Effects/Film Emulation/Dehancer Pro ~/Library/Application Support/com.dehancer.film_pro_fcp.v1 /Applications/Dehancer Lite FCP.app ~/Movies/Motion Templates/Effects/Film Emulation/Dehancer Lite ~/Library/Application Support/com.dehancer.film_lite_fcp.v1 /Applications/Dehancer Grain FCP.app ~/Movies/Motion Templates/Effects/Film Emulation/Dehancer Grain ~/Library/Application Support/com.dehancer.grain_fcp.v1 /Applications/Dehancer Halation FCP.app ~/Movies/Motion Templates/Effects/Film Emulation/Dehancer Halation ~/Library/Application Support/com.dehancer.halation_fcp.v1 /Applications/Dehancer Bloom FCP.app ~/Movies/Motion Templates/Effects/Film Emulation/Dehancer Bloom ~/Library/Application Support/com.dehancer.bloom_fcp.v1 /Applications/Dehancer Breath FCP.app ~/Movies/Motion Templates/Effects/Film Emulation/Dehancer Breath ~/Library/Application Support/com.dehancer.breath_fcp.v1 /Applications/Dehancer Monitor FCP.app ~/Movies/Motion Templates/Effects/Film Emulation/Dehancer Monitor ~/Library/Application Support/com.dehancer.monitor_fcp.v1
Uninstall Dehancer Plugin for Adobe Photoshop and Affinity Photo (Windows)
- Deactivate the plugin (use ‘License Info’ button in the plugin Settings, then press ‘Deactivate’).
- Go to C:\Program Files\Common Files\Adobe\Plug-Ins\CC\Dehancer directory on your PC.
- Run the maintenancetool.exe application.
- Choose Remove All Components, click Continue and follow uninstall steps.
Uninstall Dehancer Plugin for Adobe Photoshop and Affinity Photo (macOS)
- Deactivate the plugin (use ‘License Info’ button in the plugin Settings, then press ‘Deactivate’).
- Go to /Library/Application Support/Adobe/Plug-Ins/CC/Dehancer/ directory on your Mac.
- Run the maintenancetool.app application.
- Choose Remove All Components, click Continue and follow uninstall steps.
Unintall Dehancer Plugin for Lightroom & Capture One (Windows)
- Deactivate the plugin (use ‘License Info’ button in the plugin Settings, then press ‘Deactivate’).
- Go to C:\Program Files\Dehancer Lightroom Plugin\ directory on your PC.
- Run the maintenancetool.exe application.
- Choose Remove All Components, click Continue and follow uninstall steps.
Unintall Dehancer Plugin for Lightroom & Capture One (macOS)
- Deactivate the plugin (use ‘License Info’ button in the plugin Settings, then press ‘Deactivate’).
- Go to /Applications/Dehancer Lightroom Plugin/ directory on your Mac.
- Run the maintenancetool.app application.
- Choose Remove All Components, click Continue and follow uninstall steps.
Ps/Lr/C1/APh Plugin application path and user data location
Below you can find the main system paths of the installed application components and user data locations, which you may need when contacting support or maintaining the plug-in.
Installation (Windows)
Adobe Photoshop and Affinity Photo plugin:
C:\Program Files\Common Files\Adobe\Plug-Ins\CC\Dehancer
Adobe Lightroom and Capture One plugin: C:\Program Files\Dehancer Lightroom Plugin\Dehancer Lightroom.exe User Data (Windows)
Shared folder:
C:\Users\{user}\AppData\Local\dehancer\com.dehancer.film_shared
User Presets folder: C:\Users\{user}\AppData\Local\dehancer\com.dehancer.film_shared/presets
Adobe Photoshop and Affinity Photo plugin log: C:\Users\{user}\AppData\Local\dehancer\com.dehancer.film_shared/ dehancer_logs/photoshop_plugin.log
Adobe Lightroom and Capture One plugin log: C:\Users\{user}\AppData\Local\dehancer\com.dehancer.film_shared/ dehancer_logs/lightroom_plugin.log
Installation (macOS)
Adobe Photoshop and Affinity Photo plugin: /Library/Application Support/Adobe/Plug-Ins/CC/Dehancer
Adobe Lightroom and Capture One plugin: /Applications/Dehancer Lightroom Plugin/Dehancer Lightroom Plugin.app User Data (macOS)
Shared folder:
/Users/{user}/Library/Application Support/com.dehancer.film_shared
User Presets folder: /Users/{user}/Library/Application Support/com.dehancer.film_shared/presets
Adobe Photoshop and Affinity Photo plugin log: /Users/{user}/Library/Application Support/com.dehancer.film_shared/ dehancer_logs/photoshop_plugin.log
Adobe Lightroom and Capture One plugin log: /Users/{user}/Library/Application Support/com.dehancer.film_shared/ dehancer_logs/lightroom_plugin.log
💡 In macOS the User’s Library folder is hidden by default. You can access this folder in several ways:
- Open Finder, click Go in the menu bar, and select Go to Folder. In the dialog box, type ~/Library and click Go.
- You can unhide the Library folder permanently. Open your Home folder (select your Username in the Finder sidebar). Click View in the menu bar, and select Show View Options. Check the Show Library Folder checkbox.
- hfjsdhfsk
- hfdsjhafkd
- hkjfdhasjkfhdsak
- hjfhfskjgjfkldsgj fdksghdfhhrrthewkth rjehjkfshfkdshfkjdsahfsjkhfjksah fjkdshfkjdshkfjdsahkjf hdaskjfhdsakjfhd skahkjпапвы ааыппукпку
- 4234234
- fdsfsfsd
- fdsjakfhsdkajhfa
- fdhsajfadsk